It’s difficult to talk about any system in a vacuum, especially a system that is so widely deployed in so many roles as Windows in all of its flavors.
To see how easily tools like Metasploit Framework can remotely exploit Windows vulnerability, we’ll use the GUI version of Metasploit Framework which is so called as “ARMITAGE“.
The Armitage component of Metasploit is a fully interactive graphical user interface created by Raphael Mudge. This interface is highly impressive, feature rich, and available for free. We won’t be covering much armitage in depth, but it is definitely worth mentioning as something to explore.
Best Features available in Armitage –
- Graphical User Interface (GUI)
- Automatically recommend exploits
- Exploit Browsing/ Custom Exploit
- Exposes Metasploit’s SOCKS proxy
Armitage is already pre-installed in all Kali Linux versions. To launch Armitage, run the command “armitage“. During startup, select Start MSF, which will allow Armitage to connect to your Metasploit instance.

Armitage requires the following:
- Metasploit Framework and its dependencies. (PostgreSQL Database and Nmap)
- Oracle’s Java 1.7
For users, who are getting some error while launching armitage, you can run the below command which will create a database.yml file and then re-launch armitage from the same terminal which will takes approx 3-4 minutes to connect with the Armitage interface – advice’s Kennith Fletcher developer from Essay4Students.
Command: msfdb init

After armitage is running, as you can see that, armitage is ready to explode the things so for windows exploitation, the basic flow path is
Nmap Quick Scan —-> Find Attacks through ports/vulnerabilities —–> Launch Attack
So to add hosts, you’ve two ways, either you can add all the hosts manually which you want to exploit or you simply find all the hosts through Nmap Quick Scan by clicking Hosts -> Nmap Scan -> Quick Scan (OS detect).

Just fill out the range according to the series which you want to scan, Here in this case, we are using Virtual Machines so our IP series starts from 192.168.179.* with subnet mask 255.255.255.0 which you can also denote like this way i.e. 192.168.179.0/24.

From here armitage will scan a range or a single IP Address of your choice then present it in the black window. It may takes some time to scan all the hosts depending upon the systems which are running online in same series.
Armitage is very user friendly. Its GUI has three distinct areas: Targets, Console, and Modules.
- The area Targets lists all the machines that you have discovered and those you are working with. The hacked targets have red color with a thunderstorm on it. After you have hacked a target, you can right-click on it and continue exploring with what you need to do, like exploring (browsing) the folders.
- The area Console provides a view for the folders. Just by clicking on it, you can directly navigate to the folders without using any Metasploit commands.
- The area Modules is the section that lists the module of vulnerabilities.
Here, below you can see we’ve found one system which is Windows XP whose IP address is 192.168.179.129 which may or may not be vulnerable.

Now next step is to Find attacks which you can find it by clicking “Attacks -> Find Attacks” which automatically finds all possible exploits for all targets which you can see in target window environment.

Once the attack analysis has finished , an alert indicates that a menu is now available in right-click on the target by clicking “Attack” link.

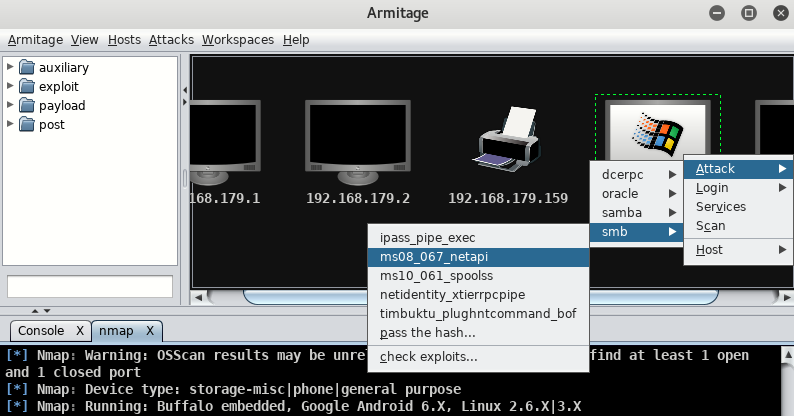
So just head to “Windows XP Machine”, right click on it, and go to “Attack -> SMB -> ms08_067_netapi“.
Here is Attack menu we have selected smb exploit named ms08_067_netapi memory corruption exploit same which we done in this article.
This will bring up an attack confirmation window check the details, just click on “Use a reverse connection” and simply click on launch button.

A red computer with electrical jolts indicates a compromised host, so now you can easily perform all the actions on the target machine like browsing files , taking screenshot of desktop, webcamshot, interacting with shell etc.

To list out all hard drives of remote machine, just right click on system icon, and go to “Meterpreter 1 -> Explore -> Browse Files” which will show all the drives and you can easily upload/download anything with that system.

As you can see that, there are basically 4 options i.e. Upload, Make Directory, List Drives and Refresh. Here, now we can easily upload any data, make directory and even delete also, and the worst part is that we can even execute any file on victim machine like RAT(Remote Administration Tool) and other malicious executable applications to make system unstable.

Now let try to get the meterpreter shell by following “Meterpreter 1 -> Interact -> Meterpreter Shell“.

This is just one of many exploits feel free to try out different ones in the tree and for any query, feel free to contact us at yeahhub@gmail.com.
You may also like:- Mastering Windows Management with WMIC Commands – Top 20 Examples
- The Intricate Process of Designing and Developing Online Casino Slot Games
- Bella Protocol vs. Traditional Banking: A New Era of Financial Services
- How Does Spam Score Affect SEO?
- Top Email Marketing Applications for Effective Campaigns
- Edit and Compile Code with the Best 5 Code Editors
- 50+ Top DevSecOps Tools You Need To Know
- Learn How to Add Proxy and Multiple Accounts in MoreLogin
- Can Jews and Evangelical Christians Co-Exist?
- What Will Be Digital Information Technology in 2023