Sometimes, the person looks good in the photo; but some other factors do not look that well, such as the light, the background, or the entire tone of the picture. This article will guide you on how to save your photo in such a situation.
Also Read: Spark fun and witty social media interactions with our free online meme templates
Don’t go for the delete button. There is a lot of hope to revive your photos. You may remove the background of your image by using some online background eraser tools. You can also alter the image’s properties by using the inbuilt photo editing software of your smartphones. Let us find out how to do it.
1. Adjust The Parameters Of The Photo
Sometimes some parameters of the photo will affect the whole picture. Adjustments in the parameters could give the image a new look. You can adjust the properties such as brightness, sharpness, contrast, etc. It is such a simple job, and you need not purchase any fancy photo-editing apps. The software to adjust the image’s properties is already there inside your smartphone. Let us review the basic steps to change the necessary parameters.
How To Do It Using Your iPhone?
Please ensure that you have updated the latest version of iOS to get the maximum variety of features to edit your images using the Photos app. Also, keep a duplicate copy of your original photograph. It is important because the iPhone’s Photos app does not store a backup copy and changes its original picture. However, there is an undo feature by which you can revert to the original image. But some people like to keep both copies, i.e., the original and the edited versions.
Now click on the ‘Edit’ button on the top right of your photograph. It will automatically open the Photos app. You will have three icons at the bottom. The first one is the adjust button and the second one is for applying filters. You will get several options to alter the different parameters in the ‘adjust icon.’ You can quickly turn an average looking photo into an amazing one.
Suggested Read: Photostick Mobile Review
After the click the ‘adjust icon,’ you will see many tools at the bottom. You can swipe right to check for more such options. Here, the Auto enhance tool is particularly useful in adjusting the color and brightness levels. You can still make finetuning in the auto-adjusted settings by swiping right. You will get several other options to make subtle changes in your photographs. They include brilliance, exposure, highlights, shadows in addition to contrast and brightness. Then, you have a black point, saturation, vibrance, warmth, tint, sharpness, noise reduction, vignette, and definition features to finetune it further.
How To Do It Using Your Android Smartphone?
The Android process is quite similar to the iPhone. In Android phones, all changes are saved in a duplicate copy of the image. So, there is no need to make a copy of the original file. To begin the process, select the image in the gallery and tap anywhere if you can’t see any icons. At the bottom, the second option is there to edit the photograph. Once you click there, you will see many sub-options. You can find the adjust button by swiping right. Clicking the adjust button will give you the brightness, sharpen, contrast, vignette, and saturation options. On selecting these icons, you will see a slider to get the desired effects in your photographs.
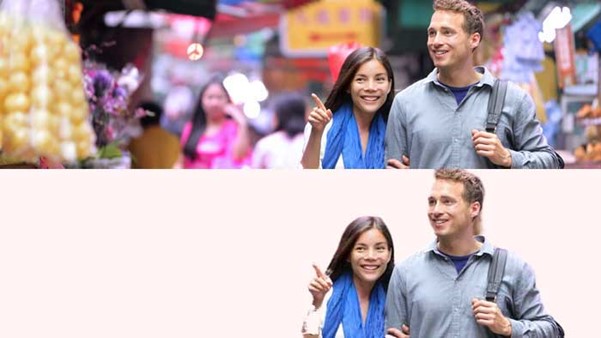
2. Change The Unwanted Backgrounds
A messy background could ruin a photo. Remove the background of your image and change it to a perfect one. It will give the image a second life.
Remove the background of your image by using BgEraser.
What Is The Function Of Bgeraser?
BgEraser is a background remover tool that is handy to remove your image’s background within a few seconds. The job of a background eraser tool is significant. It uses Artificial Intelligence, popularly known as machine learning, to find out where the background starts. It refers to a vast database of similar photographs. For instance, if you take a selfie, machine learning can automatically understand that you are the main focus in the picture, and everything else except you is the background. If you have a group photograph, it uses AI to differentiate between the main and the secondary parts.
BgEraser automatically removes the background without any manual intervention. It completes the job within five seconds. Here are the salient features of the tool:
- Free And Paid Versions: The free version is available for use only for trial and evaluation purposes. If you are a casual or first-timer, you can test how powerful it is without the need to sign up.
- Saves Time: You can remove the background of your image within five seconds. The tool is fast enough to save time.
- No Need To Learn Complicated Software: This background remover tool can convert images on the go. You do not have to know complicated software or photo editing tools. Even a layperson can operate this tool.
- Bulk Handling: The batch processing feature handles the files in bulk for paid users. You can also experience the power of bulk-handling free of cost after signup for only registered users.
- Privacy: The company is concerned about your privacy. That is why it deletes all the images uploaded by you within 24 hours.
- Blog: You can learn about the tool and its effectiveness by reading the blog. It talks about how you can use the tool for improvements in your day to day lives.
- Nine Languages: The tool is available in nine languages, including English, French, German and Chinese languages.
- Use Of Artificial Intelligence: The company calls it deep learning. It digs into a vast database to learn how you capture photographs, identifies essential parts or mess and clutter, etc.
- Full Automation: You need not intervene during the process of background removal. The background eraser automatically does the 100% job for you. Your role is only to provide the input and collect the output. You need to upload and download only.
- Accuracy: The background remover tool works with a high degree of accuracy, primarily ensured by its machine learning techniques.
- Need Not Do Any Marking: You do not have to apply red or green indicators. It is a super-easy tool to use.
- Suitable For One And All: BgEraser online background eraser tool is ideal for graphic experts, e-commerce users, beginners, designers alike. It has features ideal for all types of users. It is designed for both heavy users and personal users.
- Lower Cost Per Page: If you become a paid user, you have the option to subscribe to one of its three plans – 50, 199, and 999 images per month. The cost per print ranges from $0.03 to $0.10, depending upon the type of paid user plan and your usage patterns.
- Offline Tool: The offline tool can be downloaded as a Windows or Mac app. The size of the offline background remover tool is only a little more than 3 MB
- No Hidden Charges: The company claims that the tool is available for free and paid users, with full transparency about its costs and features. It implies that you can see for yourself that there are no hidden charges.
What Is The Easiest Way To Use Bgeraser?
BgEraser is extremely easy to use. There are three necessary steps:
- UPLOAD: Drag or Browse the image or images.
- START: Click the start button to start the conversion process.
- DOWNLOAD: Download images without background and save them on your devices.
Add A Background
Finally, add the background as you like. It will immediately enhance the image. If you were standing in the room in the original picture, now you could suddenly find yourself on a beach. Many tools are available online to add a background. Select the one that meets your requirements.
3. Add Filters.
The use of filters could change the whole photo’s tone. Adding filters could make your image reborn. Filters change the overall look immediately. You may customize the look and feel with just a few clicks. Let us see how we can do it on iPhone or Android devices.
Steps To Add Filters With iPhone.
It works with a single tap. Select the filter icon having three circles. Just swipe the filters list available, and you can immediately see the color and tone changes. Choose your favorite filter and then select the filter strength with the help of a slider. You can also remove the filter by choosing the original filter.
Steps To Add Filters With Android Devices
In the case of Android devices, it is pretty straightforward. Here also, you can select the filter icon with three circles. The filters are usually categorized and may differ as per the software version. You can see a range of filters in four categories: landscape, portrait, food, and film. Select the one you like the most. To get back to your original filter, click the ‘original’ button on the top right.
Conclusion
Keeping your photos and saving them is no longer a hard thing. You can save your favorite images using our best online background eraser tool BgEraser and inbuilt photo editing features of your smartphones.