Free SSL Certificate is perfect for those looking to instantly secure their websites with no cost or fees. Free SSL prevents warning messages from appearing when visitors view your website and displays the lock padlock for security assurance.
If you are looking to test the functionality of an SSL certificate, how they work, or how to use them, then use ZEROSSL free 90 day SSL certificate and get a trusted HTTPS connection for your website.
With an SSL certificate, your website can uses the HTTPS protocol to securely transfer information from one point to another. This is crucial when transferring sensitive information, like credit card data on checkout pages, or login/register forms.
It’s also important to understand that SSL does not protect your website. This tutorial is only designed to show beginners and intermediate users how to deploy a free SSL certificate from ZeroSSL/Let’s Encrypt/SSLFORFREE on their self-hosted websites.
Types of SSL Certificates
Some visitors recognize the additional authenticity and trust offered extended validation (EV) and organization validated (OV) certificates due to their rigorous validation process. There are three types of certificates to be familiar with:
- Domain Validated (DV) – DV certificates only need the certificate authority to verify that the user requesting the certificate owns and administers the domain. Visitors will see a lock icon in their address bar, but no specific information about the owner.
- Organization Validated (OV) – OV certificates require a certificate authority to confirm the business making the request is registered and legitimate. When visitors click the green lock icon in their browser, the business name is listed.
- Extended Validation (EV) – EV certificates require even more documentation for the certificate authority to validate the organization. Visitors will see the name of the business inside the address bar (in addition to clicking the lock icon); however, most updated browsers no longer display the EV visual indicator.
The following tutorial works best if you are using CPanel based Shared hosting. The rest of this guide will assume you have full access and control of your web server.
Step 1 – Signup on ZeroSSL.com and add your domain name under New Certificate as shown below:

Step 2 – In this step, you can choose either 90-day validity or 1-year certificate validity.

Step 3 – Now before to finalize it, it will automatically generate contact information and a CSR for your certificate. In case, if you want to change or edit any information, then please untick the following option.

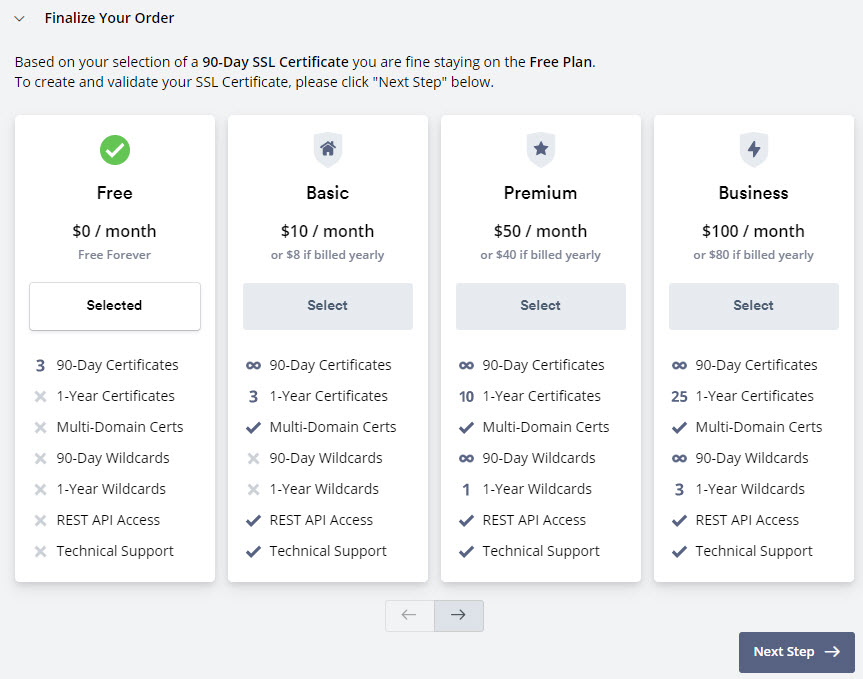
Step 4 – Based on your selection of 90-day SSL Certificate, select “Free Plan” ($0/month) option.
In this FREE plan, you can create maximum 3 SSL Certificates for your different domains with a validity of 90-day only.
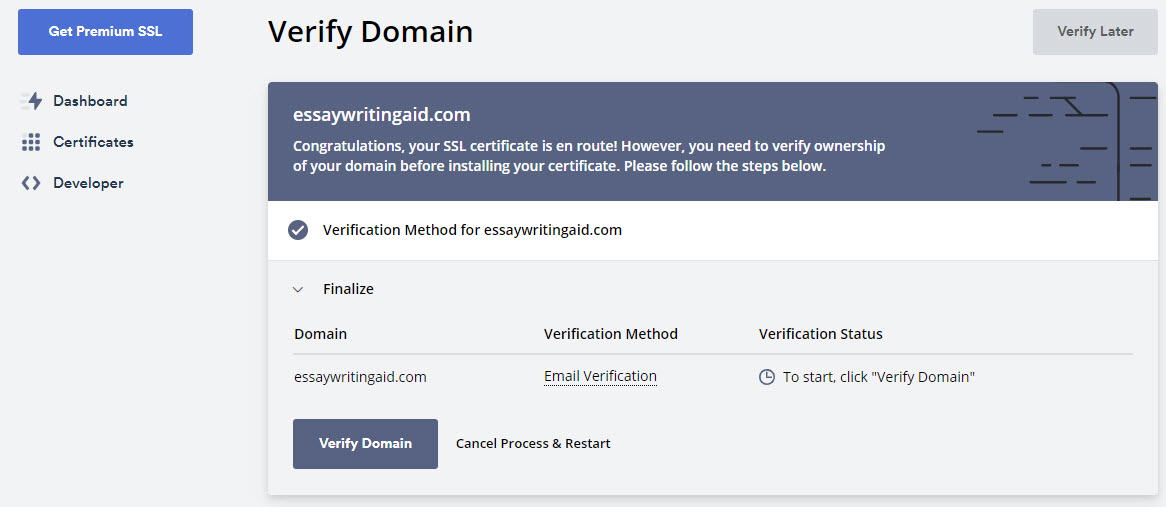
Step 5 – In order for your certificate to be issued, all domains included in your certificate will need to be verified. There are three methods that can be used to verify domains:
- email verification,
- verification via DNS (CNAME),
- verification via file upload

You can go with any method which best suits you, but here in this case, we’re going with email verification. You will receive a verification email to the selected verification email address (admin@example.com) for each of the domains in your certificate.
In order for your certificate to be issued, you will need to follow the steps shown in the verification email but sometimes it shows an ERROR related to your CAA DNS record.
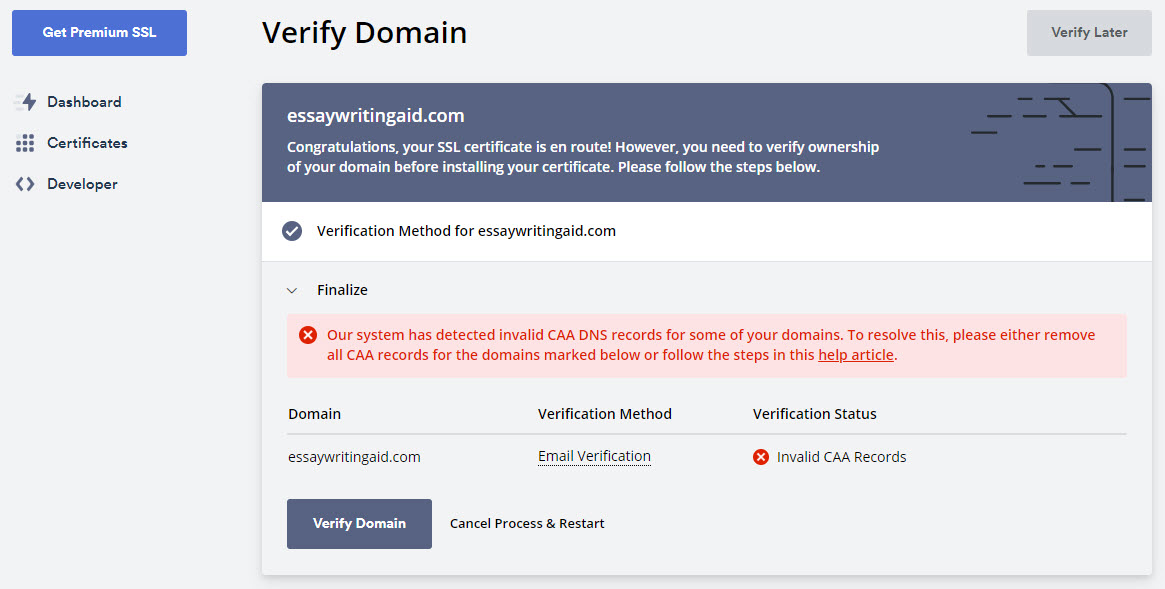
CAA records are DNS records attached to domains that specify precisely which certificate authorities are allowed to issue certificates for your domain. If your domain does not carry any CAA records, the system will not have a problem issuing your certificate. If, however, your domain has CAA records on file but none for sectigo.com as an allowed certificate authority, the system will not be able to issue your certificate.
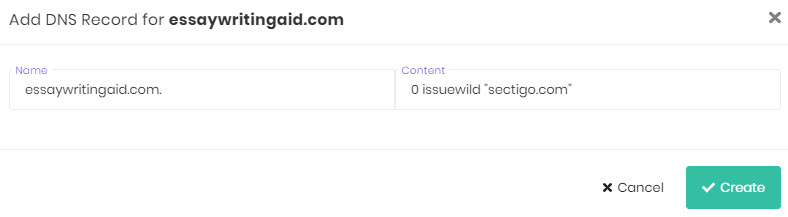
In order to add CAA records that will allow ZeroSSL to issue certificates for your domain, please log in to your domain or hosting provider, navigate to the DNS management section and add a set of CAA records as shown below:
site.com. 3600 IN CAA 0 issue “sectigo.com”

site.com. 3600 IN CAA 0 issuewild “sectigo.com”
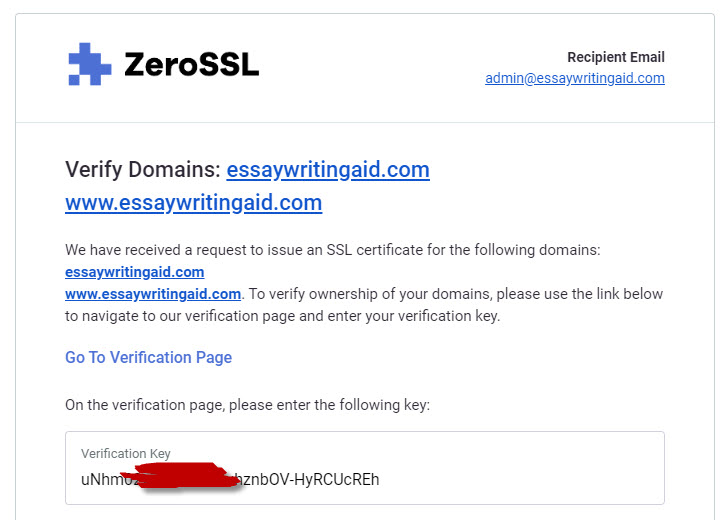
Step 6 – Now you’ll receive an email regarding the verification of Domain.

Here is the sample preview of the email where you have to click on “Go To Verification Page” link and paste the following mentioned key.

Step 7 – After completion of email verification process, you will see an option to Install the certificate as shown below.

By clicking on “Install Certificate” button, you’ll see a success message “Your certificate has been issued and is ready for installation”. Download the zip file of your SSL certificate and follow the steps below to install on your domain.

After verifying that you control the domain, check your email (the one you used in second step) for a message that says that your SSL certificate has been issued. Open it, and follow the download certificate link (or click the Launch button next to your SSL certificate in your hosting panel).

You can also use the native SSL/TLS Manager tool in Control Panel to add SSL certificates by yourself. The solution allows you to manage the installed certificates, as well as generate certificate signing requests and private keys. To access the SSL/TLS Manager, log into your cPanel ? Security tab ? SSL/TLS Manager.
Here in SSL / TLS Manager, In the box labeled CRT, Private Key and CABUNDLE, paste the content of the all respective files.

Your SSL certificate should now be installed, and the website configured to accept secure connections. You or your web host may need to restart Apache before it will work and you can even see the expiration validity of your SSL certificate (90-day).

In case, if you are facing some issues regarding SSL installation, then you can use SSL Certificate Tester tool which can helps you to diagnose common problems.
Test the certificate
Navigate to https://example.com. You should not get any certificate warning messages in your browser.
As a final test, you may navigate to https://www.ssllabs.com/ssltest/. Enter your domain name and click submit. After some time, you should get a full report and no conflicts with your chain of trust.
It is best to test with both Internet Explorer as well as Firefox, because Firefox will give you a warning if your intermediate certificate is not installed. You should not receive any browser warnings or errors.


