If you’re in the digital world at all yourself, this isn’t new but we’ve found surprisingly little in the way of a clear, comprehensive, accurate article to add an SSL certificate and migrate your website from HTTP to HTTPS.
Might be you’re aware that Google has been including HTTPS as a direct ranking factor since year 2014. SSL (Secure Sockets Layer) encrypts all information sent to and from your site. That way the private data visitors share with your site stays private.

Using SSL ensures that hackers can’t see or intercept the data your users share on your site. The secure tunnel SSL creates is especially important with sensitive information, like credit card numbers, usernames, and passwords.
Identifying whether or not a site is SSL certified is simple. An SSL certified site will start with an HTTPS in the URL address, while a site that’s not SSL certified will begin with HTTP protocol.
An SSL certificate always helps a user’s browser verify that they are not only accessing a secure website, but the certificate is also genuine and linked to the domain/website that was requested by the user.
About HTTPS –
SSL ensures that hackers cannot see or intercept the data your users share on your site. Essentially, it creates a secure tunnel between the browser and the web server. It also verifies that your site really is who it claims to be, and it’s not an imposter. So, if you’re buying something from Comodo or Let’s Encrypt an SSL certificate verifies that you’re really sharing your data with Comodo/Let’s Encrypt not some bogus site that’s going to steal your info. Having SSL protection on your WordPress website also improves your site’s Google search rankings.
Before starting the migration of HTTP to HTTPS, we highly advise you to take a fresh backup of your WordPress website. If your hosting is a cPanel based hosting, then you can easily create a full or partial backup from control panel itself.
Next step is to purchase the SSL Certificate from any third-party trusted vendor like Comodo SSL certificate or you may also go with FREE SSL.
There are 3 main types of certificates you can choose from for your site:
- Domain Validation (DV)
- Organization Validation (OV)
- Extended Validation (EV)
For most sites, DV certificates are exactly what you’re looking for. But it’s worth considering EV certificates as they show the organization in the URL bar.
Once your certificate is installed, you must migrate your site to HTTPS. By following some simple steps, you can make your transition to HTTPS easier and make sure you are getting the most out of the SEO benefit.
1. Force logins/sessions over SSL
By forcing all signed in users to use the HTTPS protocol you are ensuring that all information based between the user and the server is encrypted.
To do this, add the following piece of code in your wp-config.php file.
define(‘FORCE_SSL_ADMIN’, true);

2. Change WordPress & Site Address
Navigate to Dashboard -> Settings -> General page, change both WordPress address and site address to new HTTPS URL which redirects all of your visitors to SSL.

3. Update Permalinks
Don’t forget to update your permalinks because as soon as you change the WordPress site address to HTTPS, it should also reflect in wordpress permalink structure too. Permalinks are what people enter into their browser address bar to view one of your pages.
There are a few options for what permalink structures WordPress has available, and each of them has its own benefits.
WordPress permalink settings can be found in the main settings menu of the WordPress admin area (i.e. https://www.yourdomain.com/wp-admin/options-permalink.php) as shown below:

4. Redirect all requests from HTTP to HTTPS with 301 Redirect
Always check that existing 301’s direct to new “https” addresses to avoid redirect chains.
Adding 301 redirects is probably one of the most important steps in an HTTP to HTTPS migration. 301 redirects are a permanent redirect which passes between 90-99% of link juice (ranking power) to the redirected page. If you don’t implement 301 redirects you could seriously hurt your SEO rankings and your site even could completely drop out of SERPs overnight.
Installing a 301 Redirect Plugin is a no-brainer when it comes to enhancing the security of your website.
For Nginx servers, add the following code in your Nginx config file.
server {
listen 80;
server_name domain.com www.example.com;
return 301 https://example.com$request_uri;
}
For Apache servers, add the following code in your .htaccess file.
RewriteEngine On
RewriteCond %{HTTPS} off
RewriteRule (.*) https://%{HTTP_HOST}%{REQUEST_URI} [R=301,L]
5. Update already defined HTTP URLs
It is always best practice to use relative URLS, but there will always be times when someone has hard-coded a URL and so you will want to do a full sweep on your site and database during an HTTP to HTTPS migration.
You should update all hard coded links to HTTPS version which you can easily do with the help of some search and replace kind of plugins.
If you have Schema markup in your HTML Header, make sure that it should also be updated to https:// for all URL references.
Make sure that you must check all theme links, plugins links, any custom JS or CSS links which you’ve included so that they should point to HTTPS versions otherwise it may lead to mixed content warning errors.
Update all plugins and themes to make sure nothing breaks and that nothing contains insecure content.

6. Check Custom Folders and Sub-domains
You might have custom folders or sub-domains like “Testing” folder or “demo.example.com” that works outside the realm of WordPress but at the same time in sync with the website. In those pages and data if you have any URLs pointing to the HTTP version, then update them to HTTPS version.
7. Generate & Update Sitemap
A sitemap is a file on your site that tells Google which pages we should know about. Basically sitemaps are used to help search engine spiders like GoogleBot, BingBot etc understand your site.
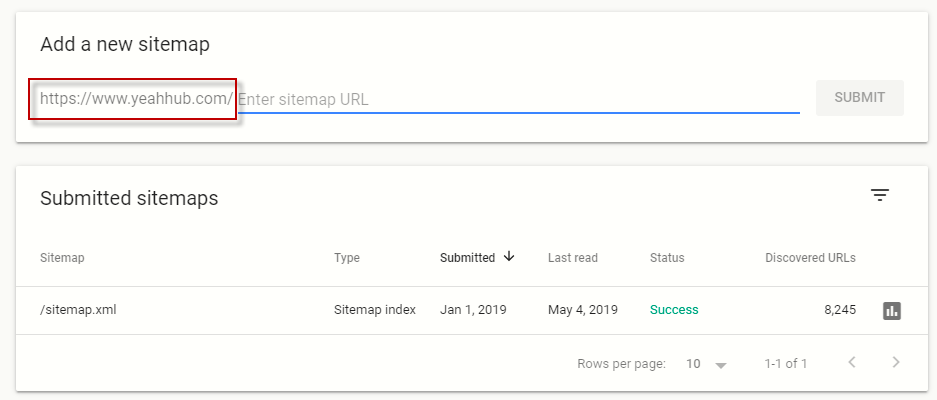
When migrating to HTTPS, you will be changing every URL on your website from HTTP to HTTPS. If you have already generated sitemap, then make sure that you must change all URLs to HTTPS inside sitemap and re-submit the sitemap to Google Webmaster Tools and Bing Webmaster Tools.
The new sitemap shall have all HTTPS links.
8. Refresh Cache
As a safety measure, we always recommend turning off any WordPress caching plugin you’ve got installed as well as JetPack and Yoast SEO (or other SEO plugin), just to avoid any potential conflicts with the HTTPS migration for the time being.
9. Google Search Console
You also need to create a new Google Search Console Profile of HTTPS version by clicking on “Add a Property” button and continue with claiming process.
After complete verification, we then recommend you to doing a FETCH AND CRAWL on your new HTTPS site just to get things moving a little faster.

10. Update Google Analytics
This is another important step where you need to edit your current settings and update to HTTPS so that you can get HTTPS URL traffic report.
In your analytics platform, make sure you update the default URL if one is required to ensure that you are tracking HTTPS properly, and add notes about the change so that you know when it occurred for future reference.
11. Analyze Robots.txt file
Your robots.txt file would show your HTTPS sitemap link and similarly for the sitemap, it would show HTTPS URLs on both versions as discussed above.
12. Scan For Mixed Content Warnings
Mixed content is when you have assets/resources on pages that try to load over HTTP instead of HTTPS. This affects many components like images, scripts, css etc. Basically there are two types of mixed content, the first is active mixed content and other is passive mixed content.
There are many ways through which you can easily scan your site for mixed content errors or warning:
a) Using Online Tools/Scanners –
These crawling tools work with any website as they are run externally:
- HTTPS Checker
- Mixed Content Scan
- SSL Check
- SSL Checker
- SSL Server Test
- Why No Padlock
- Missing Padlock
b) Using WordPress Scanners –
Here we’ve listed few stable plugins through which you can easily scan your wordpress website:
13. Enable HSTS –
This tells the browser to always use HTTPS, which eliminates a server-side check and makes your website load faster. This can also cause confusion at times, since the redirect will show as 307. It could have a 301 or a 302 behind it, though, and you may need to clear your browser cache to see the effect.
In last, you should monitor everything during the migration and double check to make sure everything is going smoothly. There are so many places where things can go wrong, and it seems like there are usually several issues that come up in any switch to HTTPS.
If you’re running a small WordPress site, most of the above considerations are probably overkill; you might be able to redirect your entire site to HTTPS in a matter of hours.
Feel free to contact us at yeahhub@gmail.com if you have any questions on any of the topic we’ve included.