
There are a lot of hackers and crackers around the world, some are good, and some are evil. Hackers always want to be anonymous while doing their work. Tools can be used in order to hide the hacker’s identity from being exposed such as VPN (Virtual Private Network), Proxy Servers and RDP (Remote Desktop Protocol) etc.
In this article, we will discuss about a built-in anonymity service in Kali Linux Operating System called as Proxychains through which you can easily mask your IP address with many proxy servers.
In especially Kali Linux OS, proxychains are pre-installed but if you are planning to use some other Linux distribution, then you need to install the TOR package by run the following command in your terminal:
Command: apt-get install tor
Let’s start by finding proxychains by typing:
Command: locate proxychains

As you can see that, proxychains is in the /usr/bin directory. Instead of running a penetration test tool, or creating multiple requests to any target directly using our IP, we can let Proxychains cover and handle the job. Add command “proxychains” for every job, that means we enable Proxychains service.
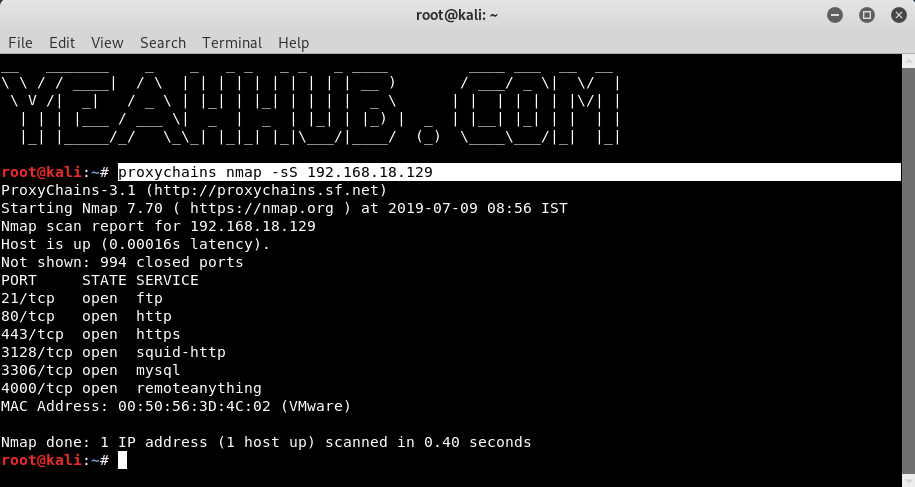
For example, If you want to scan available hosts and its ports in our network using Nmap along with proxychains, the command should look like this:
Command: proxychains nmap -sS <IP Address>
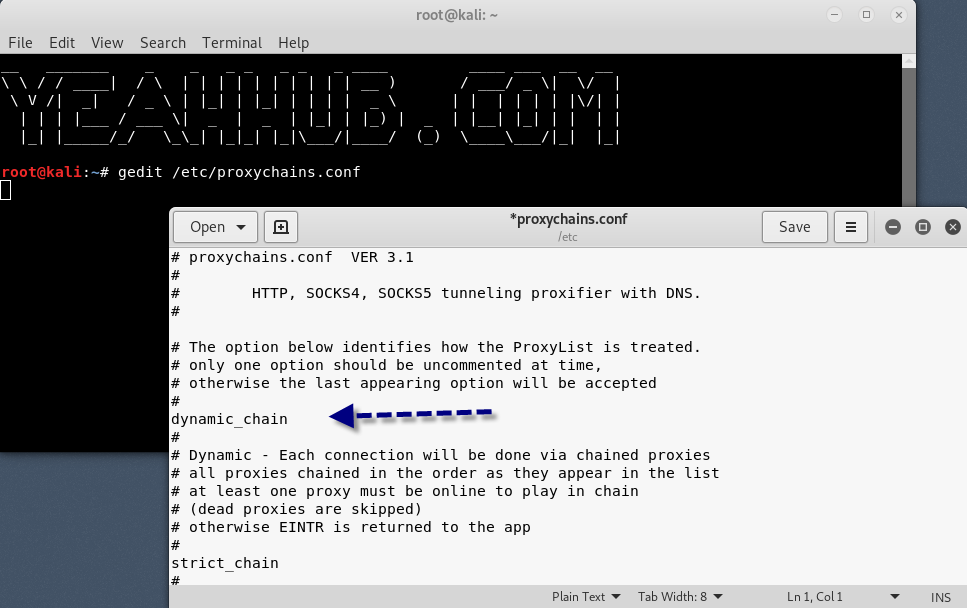
Like nearly every application/package in Linux, configuration is managed by a simple text file called the config file. In the case of proxychains, this file is /etc/proxychains.conf.
Command: gedit /etc/proxychains.conf

If we scroll down the above file a bit, you’ll see a section that we’ve highlighted labelled “add proxy here …” where you can easily add your own proxies list in any order.
To buy private Socks5 and HTTPs proxies, please visit proxy-seller.com.
Note: It’s important to note that proxychains defaults to use TOR as per proxy address points to 127.0.0.1:9050.
Basically there are 3 types of chains are available through which you can use proxychains.
- Strict Chain
- Dynamic Chain
- Random Chain
By default strict chain option is enabled. It means the traffic will route in particular order step by step like 1 to 2, 2 to 3, 3 to 4 etc. The only disadvantage of this chain is that, if any one of the proxy goes down (Let’s for example 3). then you’ll not be able to access the internet because the chain has been broken
Secondly, the dynamic chain works exactly like strict chain but it does not require all the proxies to work. If any proxy goes down, then it will automatically jump to next proxy server.
To enable Dynamic Chain, you need to uncomment the following line from configuration file located at /etc/proxychains.conf
dynamic_chain
And last, we’ve random chain which doesn’t follow the order of proxies. Each time a request is made, the traffic will routed through random proxy servers.
To enable this option, you again need to uncomment the following option as shown below:
random_chain


