
When you write a letter to someone, you usually put a complete address on the envelope specifying the country, state, and Zip Code. After you put it in the mailbox, the post office will deliver it to its destination: it will be sent to the country indicated, where the national service will dispatch it to the proper state and region. The advantage of this hierarchical scheme is obvious: wherever you post the letter, the local postmaster knows roughly which direction to forward the letter, but the postmaster doesn’t care which way the letter will travel once it reaches its country of destination.
IP networks are structured similarly. The whole Internet consists of a number of proper networks, called autonomous systems. Each system performs routing between its member hosts internally so that the task of delivering a datagram is reduced to finding a path to the destination host’s network. As soon as the datagram is handed to any host on that particular network, further processing is done exclusively by the network itself.
In first step, make sure you must stop the networking service and then again start the same service by typing below commands:
To stop/start the networking service,
Command: /etc/init.d/networking stop
Command: /etc/init.d/networking start

Ubuntu uses network-manager instead of the traditional Linux networking model. So you should restart the network-manager service instead of the network service.
To stop/start the network manager
Command: /etc/init.d/network-manager stop
Command: /etc/init.d/network-manager start

With the help of below command, you can easily bring up your interface by typing:
Command: ifconfig eth0 up
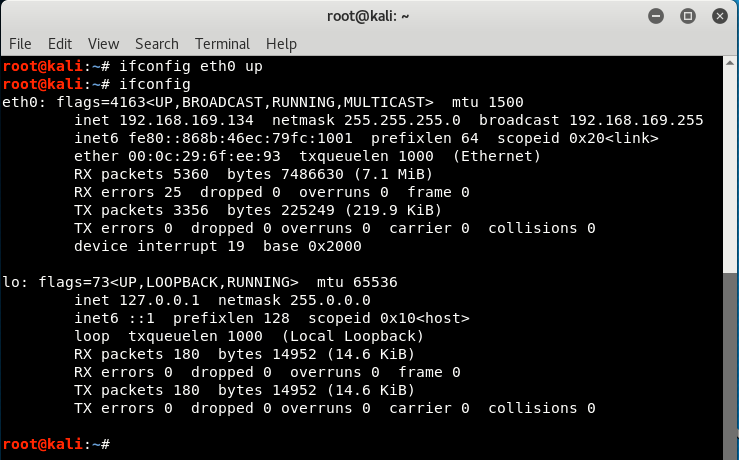
A couple of commands are used to configure the network interfaces and initialize the routing table. These tasks are usually performed from the network initialization script each time you boot the system. The basic tools for this process are called ifconfig (where if stands for interface) and route.
ifconfig is used to make an interface accessible to the kernel networking layer. This involves the assignment of an IP address and other parameters, and activation of the interface, also known as bringing up the interface. Being active here means that the kernel will send and receive IP datagrams through the interface.
The simplest way to invoke it is with:
ifconfig interface ip?address
Now we’ve two options here i.e. DHCP or Static
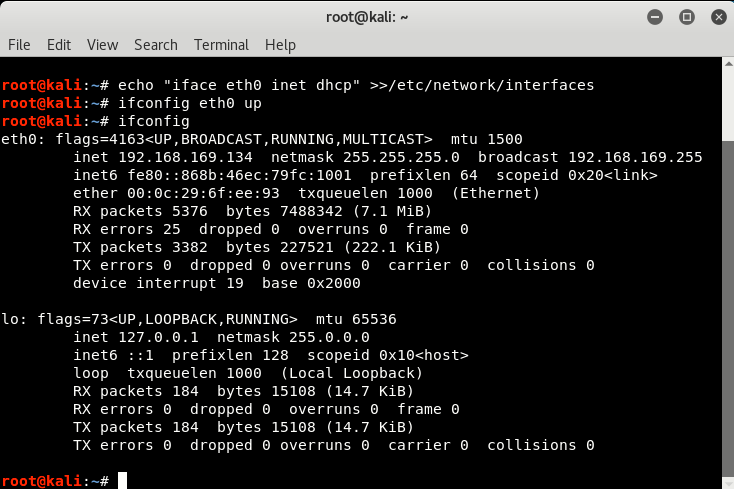
1. Setting up IP Address -DHCP (via Command Line)
Before to setup DHCP, make sure that your router is capable to serving the DHCP. To setup the IP address/netmask etc via DHCP manner, the command is:
Command: echo “iface eth0 inet dhcp” >>/etc/network/interfaces
With this, you’ll automatically get the IP Address, Subnet Mask, broadcast address, Gateway IP and DNS IP Address.
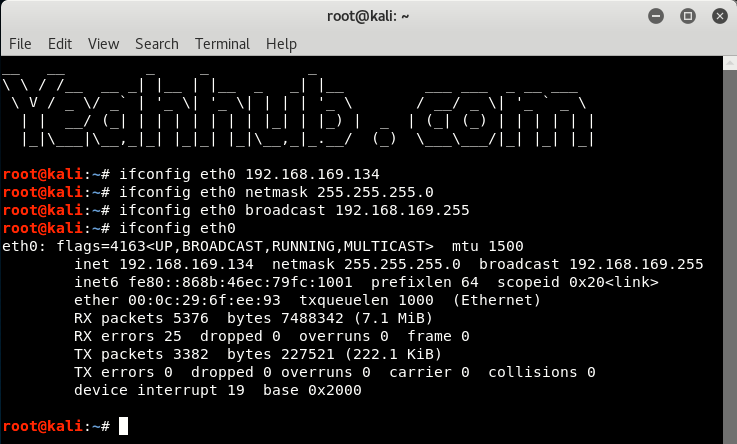
2. Setting up IP Address – Static (via Command Line) –
In static case, we’re using Class C for IP address and type the following commands to set the IPv4 address, netmask and broadcast address.
Command: ifconfig eth0 192.168.169.134
Command: ifconfig eth0 netmask 255.255.255.0
Command: ifconfig eth0 broadcast 192.168.169.255
As we’ve setup all the things manually, so the next step is to set the Gateway address.
route allows you to add or remove routes from the kernel routing table. It can be invoked as:
route [add|del] [-net|-host] target [if]
The add and del arguments determine whether to add or delete the route to target. The -net and -host arguments tell the route command whether the target is a network or a host (a host is assumed if you don’t specify). The if argument is again optional, and allows you to specify to which network interface the route should be directed the Linux kernel makes a sensible guess if you don’t supply this information.
Command: route add default gw 192.168.169.2 eth0
To check the gateway address, you can use “route -n” command as shown below:

Alternatively you can also set IP address, netmask and gateway address with just single line command as shown below:
Command: echo -e “iface eth0 inet dhcp\n address 192.168.169.134\n netmask 255.255.255.0\n gateway 192.168.169.2“>>/etc/network/interfaces

Setting up Nameserver / DNS
When configuring the resolver library to use the BIND name service for host lookups, you also have to tell it which name servers to use. There is a separate file for this called resolv.conf. If this file does not exist or is empty, the resolver assumes the name server is on your local host.
If you are on a local network and have the opportunity to use an existing name server, this should always be preferred. If you use a dialup IP connection to the Internet, you would normally specify the name server of your service provider in the resolv.conf file.
The most important option in resolv.conf is nameserver, which gives the IP address of a name server to use. If you specify several name servers by giving the name server option several times, they are tried in the order given. You should therefore put the most reliable server first. The current implementation allows you to have up to three name server statements in resolv.conf. If no name server option is given, the resolver attempts to connect to the name server on the local host.
In case if you are getting errors related to DNS then with the help of below command, you can easily setup your custom DNS servers.
Command: echo “nameserver 8.8.8.8\n nameserver 8.8.4.4” >>/etc/resolv.conf
Here we’re using Google Public DNS Servers as an example.


