
Wireshark is a graphical network protocol analyzer that lets us take a deep dive into the individual packets moving around the network. Wireshark can be used to capture Ethernet, wireless, Bluetooth, and many other kinds of traffic. It can decode different protocols that it sees, so you could, for instance, reconstruct the audio of Voice over IP (VoIP) phone calls. Let’s take a look at the basics of using Wireshark to capture and analyze traffic.
Start the Wireshark – You need to run Wireshark on an account with sufficient privileges to capture, or need to give the account on which you’re running Wireshark sufficient privileges to capture. The way this is done differs from operating system to operating system.
To be secure (at least in a way), it is recommended that even an administrator should always run in an account with (limited) user privileges, and only start processes that really need the administrator privileges.
Also Read: Live Packet Sniffing with Python Script
In windows, the WinPcap driver (called NPF) is loaded by Wireshark when it starts to capture live data. This requires administrator privileges. Once the driver is loaded, every local user can capture from it until it’s stopped again.
Following are several Wireshark features:
- Supports more than 1,000 protocols
- Ability to do live capture and offline analysis
- Has the most powerful display filters in the industry
- Captured network data can be displayed via GUI or via a command-line TShark tool
- Able to read/write many different capture file formats, such as tcpdump (libpcap), Network General Sniffer, Cisco Secure IDS iplog, Microsoft Network Monitor, and others
- Live data can be read from IEEE 802.11, Bluetooth, and Ethernet
- The output can be exported to XML, Postscript, CSV, and plaintext
In our case, we are connected with LAN (Ethernet), so we’ll go with an Ethernet Interface.
In case of Linux, you can start the Wireshark by typing “sudo wireshark” command in your terminal and select the interface and start the capturing process.

Here, Wireshark is listening to all network traffic and capturing them. So to sniff particularly POST data, you need to use filter inside Wireshark Filter Section bar. To stop the capture, you can click on the fourth icon on the top entitled Stop running the live capture, or you can navigate to Capture | Stop in the menu.
Let’s open any login page, and send a POST request to some server. The sheer volume of network traffic captured by Wireshark can be a bit overwhelming because, in addition to our HTTP traffic, every other packet to or from the system is captured. To find specific interesting packets, we can use Wireshark filters. The Filter field is located at the top left of the Wireshark GUI. As a very simple first Wireshark filtering example, let’s look for all traffic that uses the HTTP protocol.
You should see packets in Wireshark from the system with IP address 10.228.xxx.xxx to 10.228.xxx.xxx and vice versa, with the Protocol field marked
as HTTP.
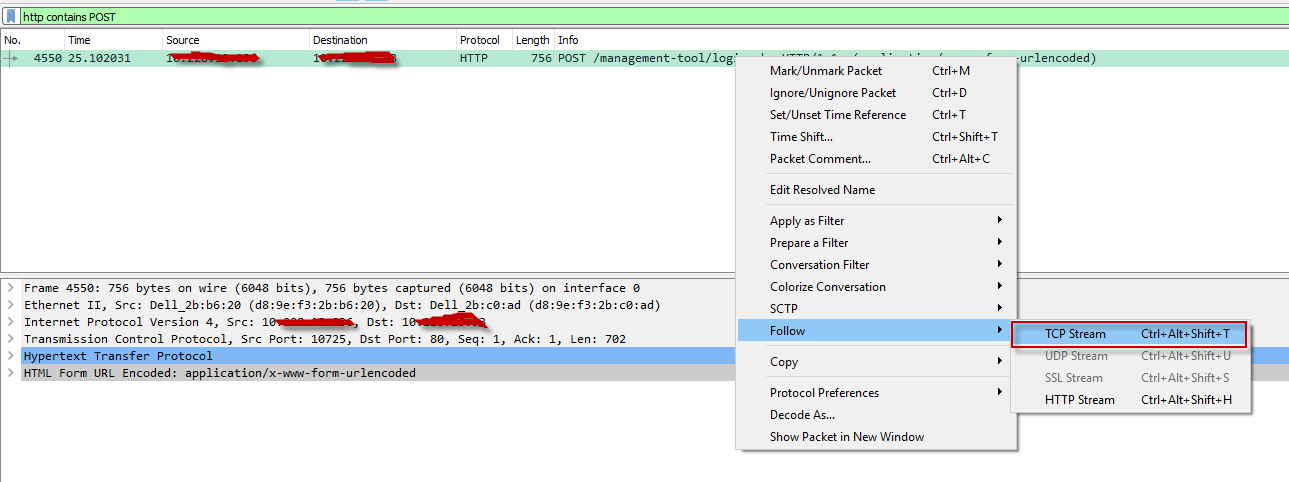
Filter: http.request.method == “POST”
or
Filter: http contains POST

Now further you can analyze this POST data by clicking the right click and navigate to Follow -> TCP Stream
As expected, Wireshark filters the captured packets to show only those that use the HTTP protocol. We can see our entire HTTP conversation, including our login information, in plaintext.
Even after filtering traffic, there may be multiple HTTP connections captured during the same time frame, so it could still be difficult to tell what’s going on. But once we find an interesting packet, such as the beginning of an HTTP login, we can dig deeper into the conversation by right-clicking the packet and selecting Follow TCP Stream as shown below:

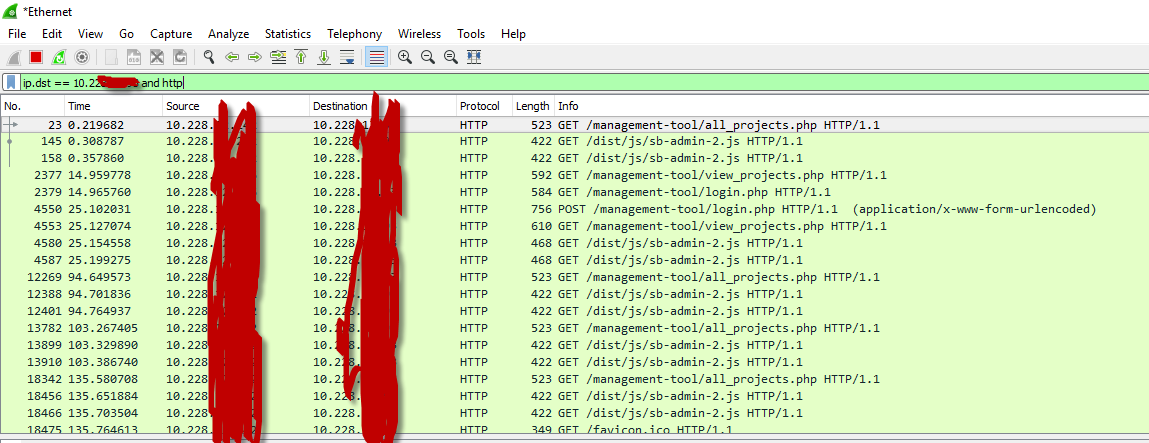
We can use more advanced filters to further fine-tune the packets returned. For example, we can use the filter ip.dst==10.228.xxx.xxx to return
only packets with the destination IP address 10.228.xxx.xxx. We can even chain filters together, such as using the filter ip.dst==10.228.xxx.xxx and http to find only HTTP traffic destined for 10.228.xxx.xxx.


I just need to decipher what they are doing. I tried using Wireshark but it’s very complex to get the actual POST data using Wireshark.